
Anyone who works regularly in AutoCAD has run into this frustrating situation: two or more objects overlap on the drawing, and no matter how many times you click, only the topmost object gets selected. The object hidden underneath seems completely inaccessible. If you’ve ever wondered whether AutoCAD used to show a pop-up list letting you choose which overlapping object to select — and now it doesn’t — you’re not imagining things. The feature is called Selection Cycling, and if it has stopped working, it simply means the setting has been switched off.
This guide walks through exactly how to turn Selection Cycling back on, how to add the button to your status bar if it’s missing, and how to fine-tune its behavior using the SELECTIONCYCLING system variable and the Drafting Settings dialog.
What Is Selection Cycling in AutoCAD?
Selection Cycling is a built-in AutoCAD feature designed specifically for situations where multiple objects overlap or sit directly on top of one another. When enabled, hovering near a cluster of overlapping objects triggers a small badge (an icon showing stacked squares) near the cursor. Clicking that badge opens a Selection list, letting you pick the exact object you want — whether it’s a line, a block, a hatch, or anything else buried beneath other geometry.
Without this feature active, AutoCAD defaults to selecting only the object nearest to the top of the draw order, which makes editing dense or complex drawings unnecessarily tedious.
Turning On Selection Cycling
The fastest way to enable Selection Cycling is directly from the status bar at the bottom of the AutoCAD window.
- Locate the Selection Cycling icon in the status bar and click it to toggle it on.
- Move your cursor near the overlapping objects. When the overlap badge appears next to the cursor, click it.
- The Selection dialog box will pop up, listing the objects at that location. Click the one you want to select.
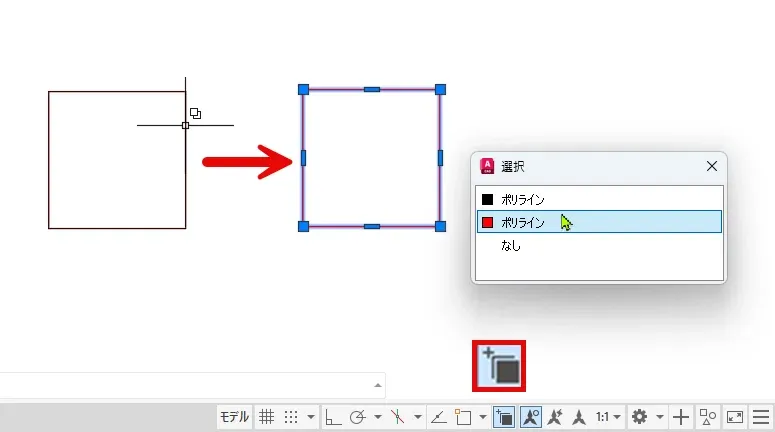
Once enabled, you’ll be able to reliably grab any object in a stack of overlapping geometry, rather than being stuck with whatever happens to sit on top.
Adding the Button If It’s Missing From the Status Bar
In some AutoCAD configurations, the Selection Cycling button isn’t shown on the status bar by default. If you don’t see it, you can add it manually through the status bar’s customization menu.
- Click the Customization button at the far-right end of the status bar (it looks like a small icon with a downward arrow or three horizontal lines, depending on your version).
- From the list that appears, check Selection Cycling to add it to the status bar.
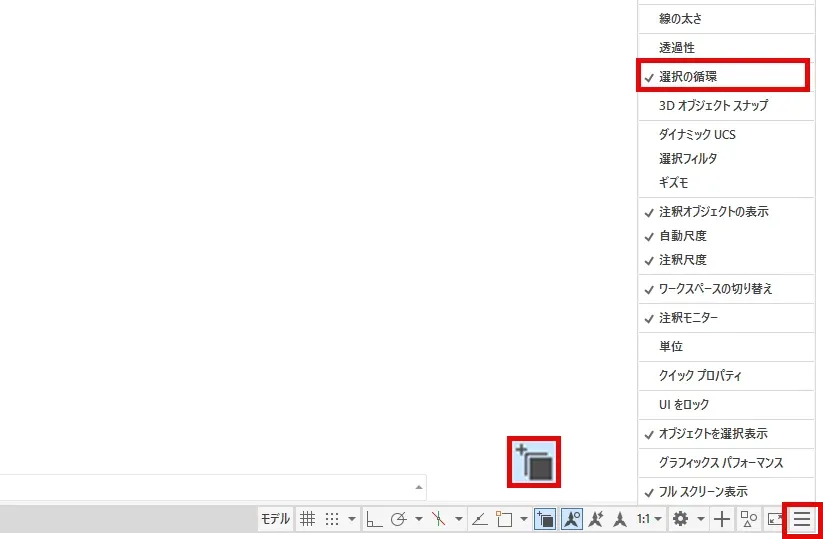
Once added, the button will remain on your status bar for future sessions, so you won’t need to repeat this step every time you open AutoCAD.
Fine-Tuning Selection Cycling Behavior
For users who want more control over how the Selection list behaves — such as where it appears on screen relative to the cursor — AutoCAD provides deeper configuration options through the DSETTINGS command.
Running DSETTINGS opens the Drafting Settings dialog box, which includes a dedicated Selection Cycling tab. From here, you can adjust the display position of the selection list, enable or disable the list box entirely, and configure other related behaviors to match your workflow preferences.
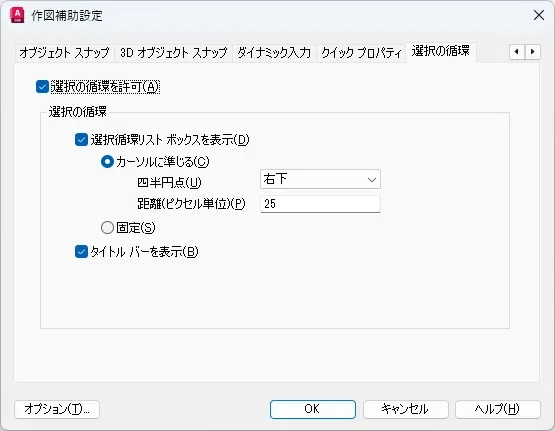
This level of customization is particularly useful for users working on dense mechanical or architectural drawings where overlapping geometry is common and precise object selection is critical to efficient editing.
Conclusion
If you’ve lost the ability to select objects hidden behind others in AutoCAD, the fix is almost always the same: Selection Cycling has been turned off, either intentionally or by accident. Re-enabling it from the status bar restores the familiar pop-up selection list, and if the button itself has gone missing, the Customization menu lets you bring it back in seconds. For anyone who wants finer control, the DSETTINGS command and its Selection Cycling tab offer additional options to tailor the feature to your specific drafting needs.
Keeping this simple toggle in mind can save significant time when working with complex, overlapping drawings — so the next time an object seems unreachable, remember that it’s probably just one click away.