When a person suffers from dehydration, the solutions are usually limited to drinking water or receiving intravenous (IV) fluids. However, our pets have a unique biological advantage. Many animals have looser skin than humans, allowing them to receive hydration through subcutaneous fluids—liquids injected directly into the space just beneath the skin.
This method is highly effective, more affordable than hospital IV treatments, and, most importantly, can be safely performed by pet owners in the comfort of their own homes. While emergency cases with severe lethargy still require a veterinary clinic’s IV drip, many chronic conditions can be managed at home with the right knowledge and equipment.
Why Do Some Pets Need Subcutaneous Fluids at Home?
Veterinarians typically recommend home subcutaneous fluid therapy for pets dealing with long-term illnesses that lead to chronic dehydration. Common conditions include:
- Kidney Disease: Helping the kidneys flush toxins when they can no longer concentrate urine.
- Cancer: Supporting the body during taxing treatments or advanced stages.
- Severe Constipation: Maintaining hydration to aid digestive motility.
- Chronic Vomiting and Diarrhea: Replacing lost electrolytes and water.
It is important to note that pets with heart disease, edema, or certain types of kidney failure where urine is not being produced are not good candidates for this therapy. In these cases, adding more fluid can lead to a dangerous condition called fluid overload.
What Is in the Fluid Bag?
The fluids used for pets are essentially the same as those used for humans. The most common solution is Lactated Ringer’s, which contains a balanced mix of sodium, chloride, potassium, calcium, and lactate. This specific formula is preferred because it mimics the body’s natural chemistry and does not sting when administered under the skin.
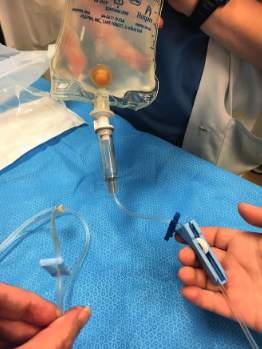
Essential Equipment Checklist
Before you begin, ensure you have the following supplies prescribed by your veterinarian:
- Fluid Bag: Usually Lactated Ringer’s in 250ml to 1000ml sizes.
- IV Line (Administration Set): A long line is better for wiggly pets, while shorter lines work for pets that stay still on a table.
- Needles: Generally 18-gauge (faster flow) or 20-gauge (more comfortable but slower).
- Sharps Container: For safe disposal of used needles.
- A Hanging Hook: The bag must be positioned at least 2 feet above your pet to allow gravity to do the work.
Step-by-Step: Setting Up and Administering Fluids
Preparation
First, wash your hands thoroughly. You may choose to gently warm the fluids by placing the bag in a bowl of warm water (95-99°F) inside protective plastic bags. Ensure the spike port of the fluid bag remains sterile; do not touch the plastic spike to anything other than the bag itself.
Hang the bag high and squeeze the bulb until it is about one-third full. This allows you to monitor the drip rate. Run a small amount of fluid through the line to remove air bubbles before attaching a fresh needle.
Giving the Fluids
Choose a quiet spot. Most owners find success by pinching a fold of skin over the pet’s back (between the shoulder blades or near the hips). Insert the needle—opening side up—into the “tent” of skin you’ve created.
Open the clamp and watch the bulb. If the flow is slow, slightly adjust the needle’s angle. The process usually takes 5 to 15 minutes. Once the prescribed amount is reached, clamp the line and remove the needle. Apply light pressure with a clean cloth to the site for a minute.
Post-Treatment Expectations and Side Effects
After the session, it is perfectly normal for a soft bulge to appear at the injection site. Because of gravity, this lump may migrate toward the chest or belly over a few hours. It should be fully absorbed within 6 to 24 hours.
When to call the vet:
- If the previous fluid bulge hasn’t disappeared by the time the next dose is due.
- If your pet shows signs of difficulty breathing or persistent coughing.
- If there is redness, heat, or unusual discharge at the injection site.
- If your pet does not urinate for more than 12 hours.
Tips for Success with Difficult Pets
If your pet is anxious, try the “Towel Wrap” or “Burrito” method for cats, or use high-value treats like tuna puree or specialized pet lickables during the process. For pets that recognize the sound of the equipment, try setting up the bag long before the actual treatment time to decouple the “setup noise” from the experience.
Administering fluids at home can significantly improve the quality of life for pets with chronic illness, allowing them to remain hydrated and comfortable in their favorite environment.
References:
- American Animal Hospital Association (AAHA) – Fluid Therapy Guidelines
- International Society of Feline Medicine (ISFM) – Chronic Kidney Disease Management
- Dr. Jennifer S. Fryer, DVM – Clinical Instructions for Home Care