Applying borders to your spreadsheet is one of the most effective ways to organize data, highlight important figures, and make your reports look professional. Whether you are using Excel for Microsoft 365, Excel for the Web, or desktop versions like Excel 2024 and 2021, mastering cell borders is a fundamental skill for any office professional.
In this guide, we will walk you through the various methods to add, customize, and remove borders to ensure your worksheets are both functional and visually appealing.
Quick Steps to Apply Predefined Cell Borders
Microsoft Excel provides a variety of built-in border styles that you can apply with just a few clicks. These are perfect for quickly outlining a header row or separating totals from the rest of your data.
- Select the range: Highlight the specific cell or group of cells you wish to format.
- Navigate to the Font group: On the Home tab, locate the Font group.
- Choose your style: Click the arrow next to the Borders icon. A dropdown menu will appear with options like “Bottom Border,” “All Borders,” or “Thick Outside Borders.” Select the one that fits your needs.
Pro Tip: The Borders button usually remembers your last used style. If you want to apply the same border to a different area, you can simply click the button itself instead of the dropdown arrow.
How to Create Custom and Diagonal Borders
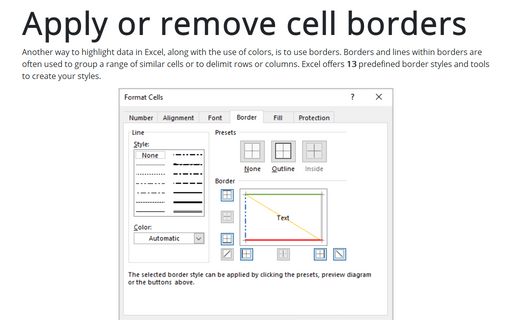
Sometimes, standard borders aren’t enough. If you need a specific color, a unique dashed line, or a diagonal strike-through to indicate a null value, you can access the Format Cells dialog.
- Select your cells and click the arrow next to Borders, then choose More Borders at the bottom of the list.
- In the Border tab, you can choose the specific Line Style (thin, thick, double, etc.) and Color.
- Under the Presets section, click the buttons to place the border exactly where you want it—top, bottom, left, right, or even diagonally.
Drawing Borders Manually
For more complex layouts, the Draw Borders tool allows you to “paint” borders directly onto the grid. This is particularly useful when you want to apply borders to non-contiguous cells quickly.
- Go to the Home tab and click the Borders arrow.
- Choose Draw Borders (for outer edges) or Draw Border Grid (to apply borders to all gridlines in the area you select).
- Your cursor will turn into a pencil. You can now click and drag over the cells you want to outline.
- To change the appearance before drawing, use the Line Color and Line Style options within the same dropdown menu.
Creating Reusable Custom Cell Styles
If you frequently use a specific border combination—such as a blue double-line border for headers—it is much more efficient to create a Cell Style. This ensures consistency across your entire workbook.
- On the Home tab, within the Styles group, select Cell Styles. If it’s hidden, click Styles then the More button.
- Select New Cell Style and give it a name (e.g., “Company_Header”).
- Click Format and go to the Border tab to define your lines and colors.
- Click OK. Now, whenever you need that specific look, you can just select your cells and click your custom style from the gallery.
Removing Cell Borders
If your worksheet starts looking too cluttered, removing borders is just as easy as adding them. You have two main ways to clear the formatting:
- The Selection Method: Highlight the cells, click the Borders arrow on the Home tab, and select No Border.
- The Erase Method: Select the Borders arrow and choose Erase Border. Your cursor becomes an eraser, allowing you to click on specific lines to remove them individually.
Important Considerations for Printing
It is important to remember that the light grey gridlines you see on your screen do not automatically print. Cell borders, however, do. If you want your printed document to look like a table, you must apply borders.
Conversely, if you prefer the look of gridlines without manually adding borders to every cell, you can enable “Print Gridlines” in the Page Layout tab. This is often a cleaner solution for large data sets where individual borders might feel overwhelming.
Conclusion
Mastering cell borders in Excel allows you to transform a raw data dump into a readable, professional document. By combining predefined styles for speed and custom styles for brand consistency, you can significantly improve the user experience of your spreadsheets. Experiment with different line weights and colors to find the hierarchy that works best for your data.
References:
- Microsoft Support: Apply or remove cell borders on a worksheet.
- Excel Tech Community: Advanced Formatting Tips.