If you’ve ever worked with complex CAD designs, you know how quickly files can become cluttered with unused or redundant elements. Deleting unnecessary blocks is one of the most effective ways to optimize file size, improve performance, and maintain a well-organized workspace. But finding and removing these blocks efficiently requires a systematic approach. This comprehensive guide will walk you through everything you need to know about how to delete blocks in CAD, from identifying their locations to executing the removal process safely.
What Is a Block in CAD?
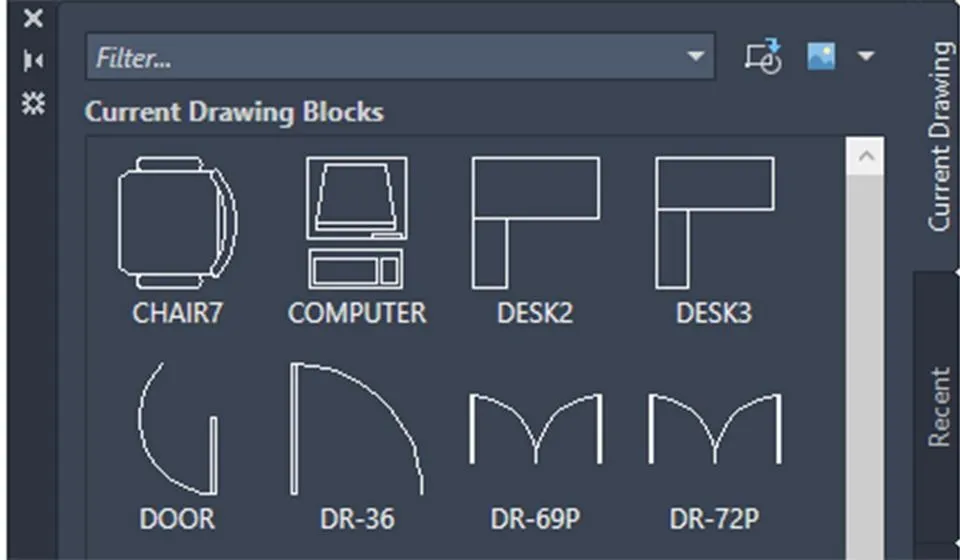
In Computer-Aided Design (CAD) software, a block is a reusable collection of objects grouped into a single entity. Think of it as a building block—a pre-defined component that can be inserted multiple times across your drawing. Blocks commonly represent:
- Geometric shapes and symbols
- Technical annotations
- Standard components like nuts, bolts, or doors
- Electrical symbols and diagrams
- Title blocks and legends
The beauty of blocks lies in their efficiency. When you modify a block definition, every instance of that block updates automatically, ensuring consistency across your entire project. You can move, copy, scale, and rotate blocks without affecting their original definitions, streamlining the design process significantly.
When Should You Delete Blocks in CAD?
Knowing when to remove blocks is just as important as knowing how. Here are the most common scenarios where block deletion becomes necessary:
1. Updating or Revising Information
When a block’s content becomes outdated or requires modification, you may need to delete the existing block and replace it with an updated version. This is particularly common when design specifications change mid-project.
2. Removing Unused Elements
Blocks that serve no purpose—whether they were part of an abandoned concept or simply inserted by mistake—should be eliminated. These redundant blocks contribute to file bloat without adding value.
3. Freeing Up System Resources
Every block stored in a drawing consumes memory. Deleting unused blocks reduces file size, improves load times, and enhances overall software responsiveness, especially in large-scale projects.
4. Resolving Conflicts and Errors
Occasionally, corrupted blocks or those with conflicting properties can cause errors during rendering, printing, or collaboration. Removing these problematic blocks often resolves these issues.
5. Streamlining Project Management
In complex collaborative projects, maintaining a clean block library is essential for version control, file sharing, and ensuring that all team members work with the most current assets.
Step-by-Step: How to Find Blocks in CAD
Before you can delete a block, you need to locate it. AutoCAD’s Quick Select feature makes this process straightforward:
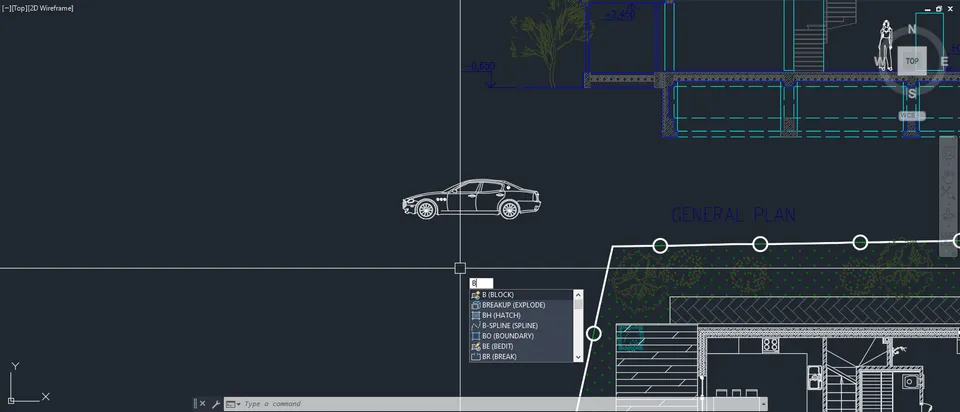
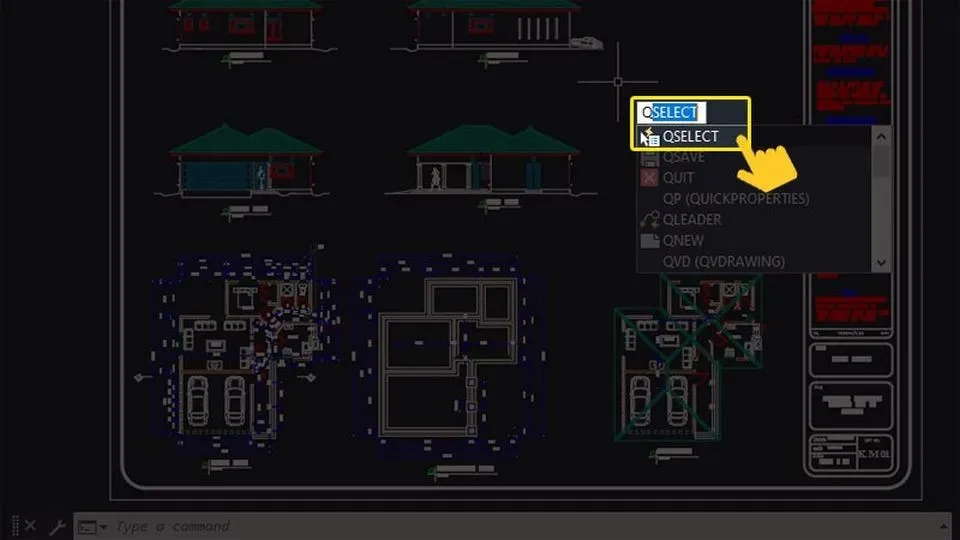
Step 1: Access the Quick Select Tool
Begin by typing QSELECT into the command line and press Enter. This opens the Quick Select dialog box.
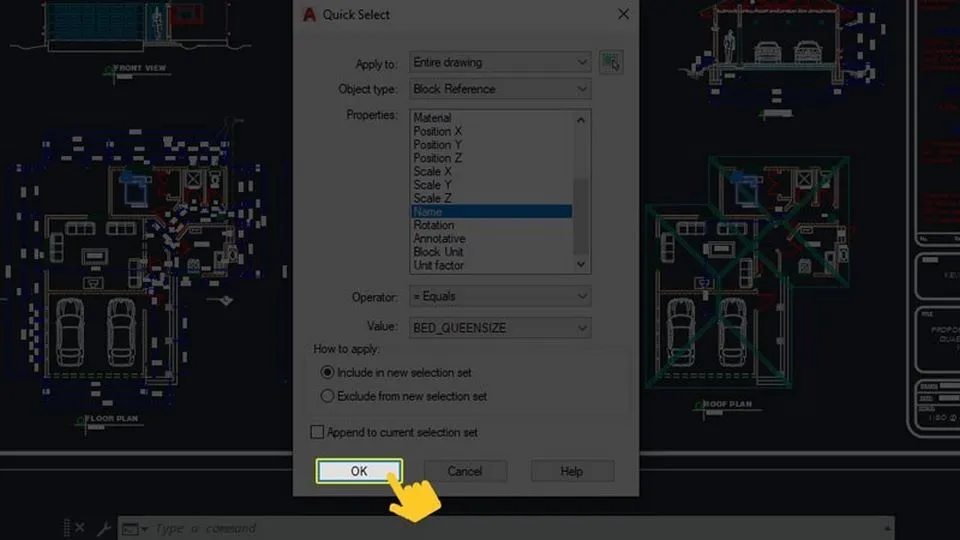
Step 2: Configure Selection Parameters
Set up the following filters in the Quick Select dialog to isolate specific blocks:
- Apply to: Select “Entire drawing” to search the complete file
- Object type: Choose “Block Reference” to target blocks specifically
- Properties: Pick “Name” to filter by block identity
- Operator: Keep “= Equals” for exact name matching
- Value: Select the specific block name you want to locate
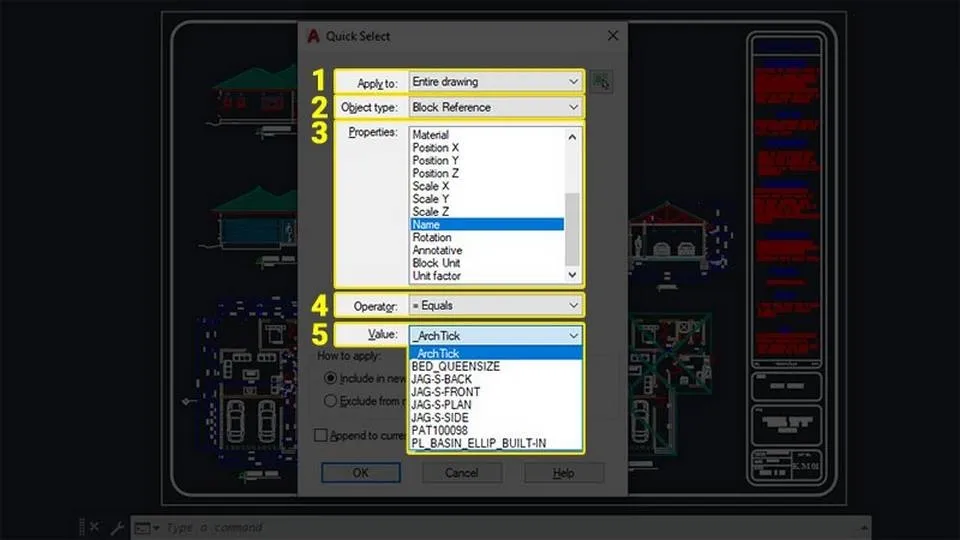 Configuring Quick Select parameters for precise block location
Step 3: Execute the Search
Click OK to begin the search. AutoCAD will scan your drawing and highlight all instances of the selected block.
Step 4: Review the Results
The command line will display the total number of matching blocks found, while the drawing area shows their exact positions, often with selection grips for easy manipulation.
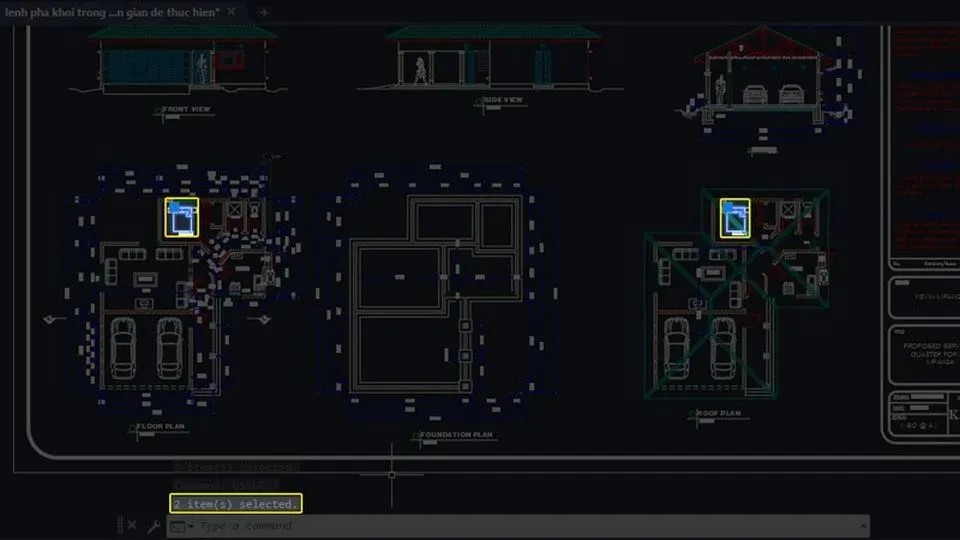 Complete block identification process
How to Delete Blocks in AutoCAD Using the Purge Command
The most reliable method for removing blocks—especially those that aren’t currently inserted but still exist in the drawing database—is the PURGE command. Here’s how to use it effectively:
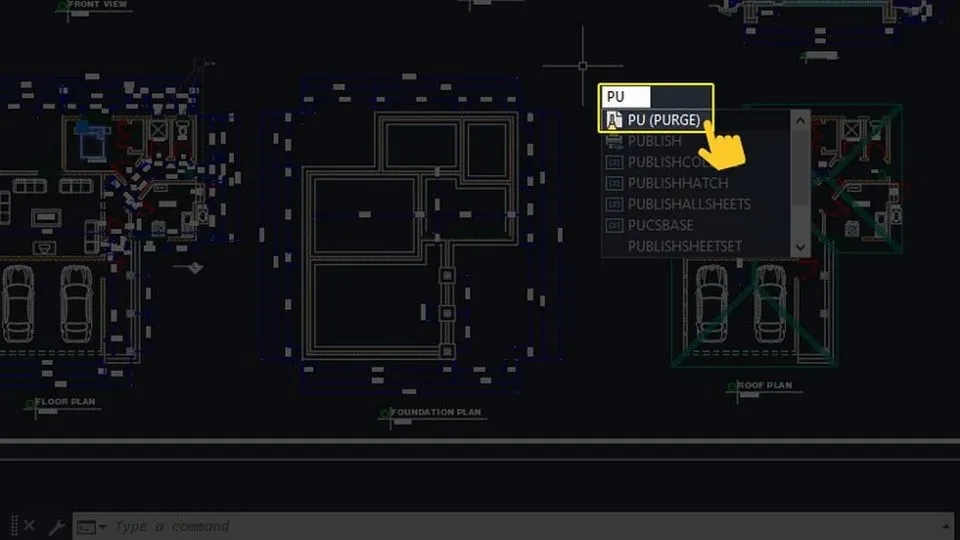
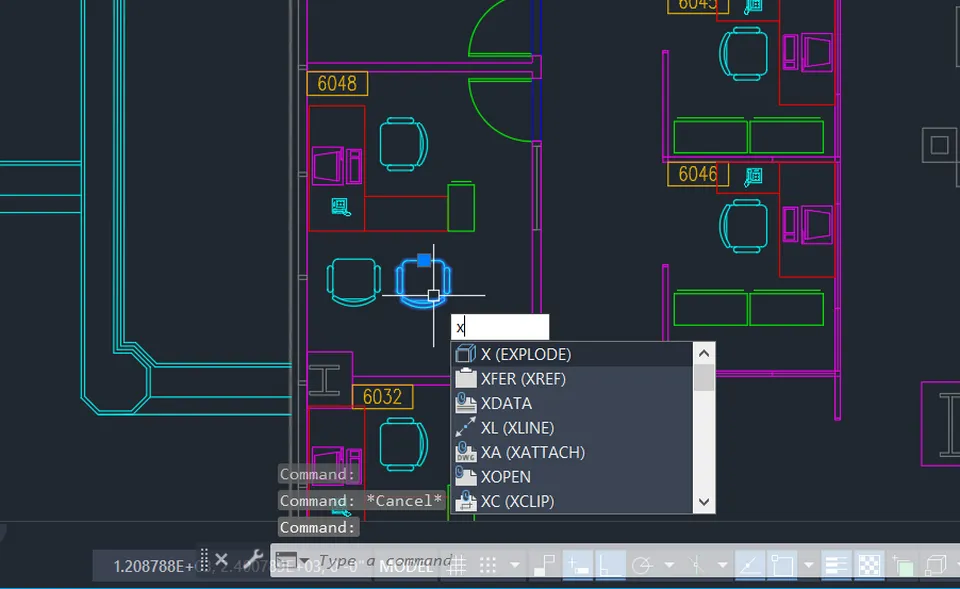
Step 1: Launch the Purge Tool
Type PU (the shortcut for PURGE) into the command line and press Enter. This opens the Purge dialog box, your control center for cleaning up unused elements.
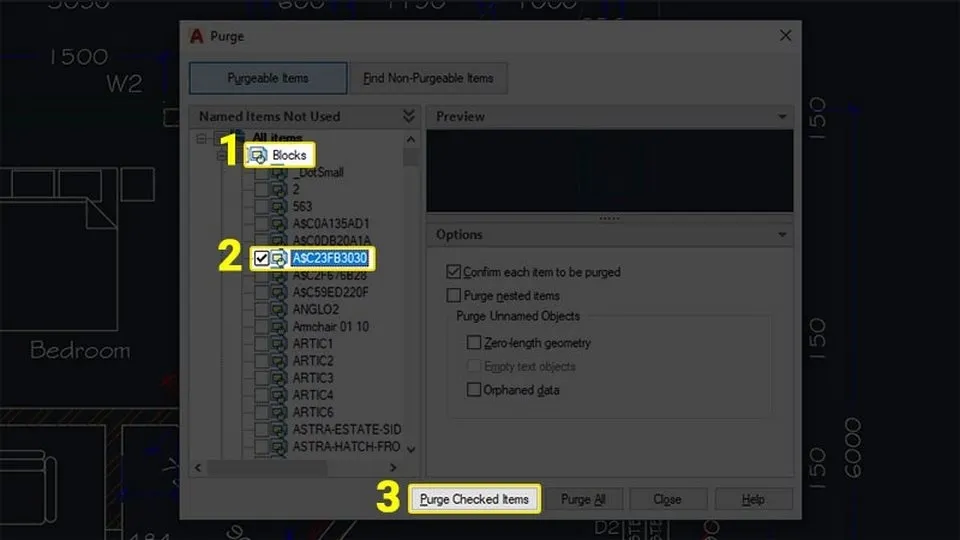
Step 2: Select Blocks for Removal
In the Purge dialog, locate and expand the “Blocks” section by double-clicking it. This reveals a complete list of all blocks stored in your drawing. For each block you wish to delete, check the square box next to its name.
Pro tip: Pay attention to blocks marked with a plus sign (+) next to their names—these are currently inserted in the drawing and cannot be purged until all instances are erased.
 Selecting blocks to remove in Purge dialog
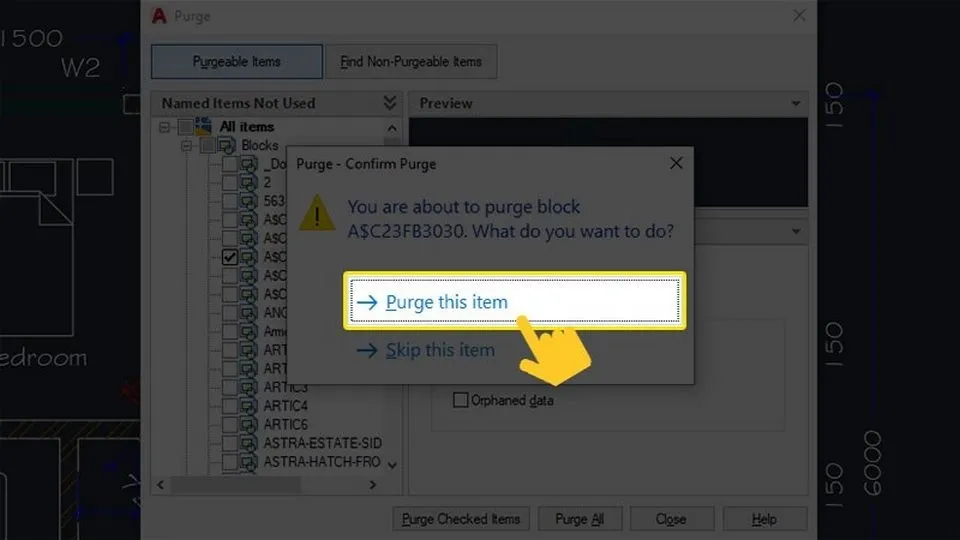
Step 3: Confirm the Deletion
After selecting the blocks, click “Purge Checked Items.” A confirmation dialog will appear asking you to verify the action. Select “Purge this item” to proceed with the removal.
Essential Tips for Deleting Blocks Safely
To ensure your block deletion process goes smoothly without compromising your work, keep these best practices in mind:
1. Always Create a Backup
Before performing any deletion operations, save a copy of your drawing or create a backup. This simple precaution protects you from irreversible mistakes and provides a safety net for complex projects.
2. Double-Check Your Selection
It’s surprisingly easy to select the wrong block, especially in drawings with similar or poorly named blocks. Take a moment to verify each selection before confirming deletion.
 Important considerations for effective block management
3. Understand Dependencies
Some blocks may be nested within other blocks or referenced by external files. Deleting such blocks can cascade changes throughout your drawing. Use the Purge command’s “Find Non-Purgeable Items” option to identify dependencies before removal.
4. Follow a Systematic Workflow
Consistency reduces errors. Adopt a structured approach:
- Identify target blocks using Quick Select
- Document which blocks you plan to remove
- Execute deletion with the Purge command
- Verify results and save the cleaned drawing
5. Purge Regularly, Not Just Once
Make purging a regular part of your workflow rather than a last-minute cleanup. Periodic purging maintains file efficiency and prevents the accumulation of digital clutter.
Frequently Asked Questions About CAD Block Deletion
Can I Recover a Block After Deleting It?
Yes, recovery is possible through several methods, though success depends on when and how the deletion occurred:
 Various methods for block recovery
Undo Command (Ctrl+Z): If the deletion was recent and you haven’t performed other operations, simply typing UNDO or pressing Ctrl+Z can restore the block immediately.
Backup Files: If you created a backup before deletion—which is always recommended—you can extract the block from that saved version.
Version Control Systems: For projects using version management software, you can revert to a previous commit or version containing the deleted block.
Software-Specific Recovery: Some CAD applications maintain temporary files or have built-in recovery features. Check your software’s documentation for specialized recovery tools.
Remember that recovery is not guaranteed, which reinforces why careful deletion and regular backups are essential.
Does Deleting a Block Affect the Rest of My Drawing?
The impact varies based on the block’s role in your design:
Structural or Model Components: If the block is integral to the design structure—such as a support beam in an architectural drawing or a gear in a mechanical assembly—its removal can create gaps, misalignments, or even break functional relationships between components.
Standards and Symbols: Deleting blocks that represent standardized symbols (like electrical outlets or plumbing fixtures) may remove critical information from your drawing, leading to confusion for collaborators or contractors.
Annotations and Labels: Title blocks, callouts, and labels serve reference purposes. Removing them can compromise the drawing’s clarity and professionalism.
The key takeaway is to assess each block’s purpose before deletion. When in doubt, consider whether a block might be referenced elsewhere or serves a documentation function beyond its visual appearance.
 Effective block deletion techniques for clean drawings
Advanced Considerations for Professional CAD Workflows
For users managing large-scale projects or working in collaborative environments, consider these additional factors:
Audit and Recover
After purging blocks, run the AUDIT command to check for and fix errors in the drawing database. This ensures file integrity and prevents issues that could affect future modifications.
External References (Xrefs)
Blocks contained within externally referenced files cannot be purged directly. You’ll need to open the source drawing, perform cleanup there, and then reload the Xref in your main file.
Custom Block Libraries
Maintain a separate, organized library of frequently used blocks rather than storing them in every drawing. This reduces file sizes and centralizes updates, allowing you to modify blocks in one location rather than across hundreds of files.
Conclusion
Mastering how to delete blocks in CAD is more than just learning a command—it’s about adopting a mindset of digital organization and efficiency. By understanding what blocks are, recognizing when they need removal, and using tools like Quick Select and Purge effectively, you can maintain cleaner, faster, and more reliable CAD drawings.
Remember that successful block management balances thoroughness with caution. Always backup your work, verify selections before deletion, and regularly audit your files to catch issues early. Whether you’re an architect refining building plans, an engineer perfecting mechanical assemblies, or a student learning the fundamentals, these techniques will serve you well throughout your CAD journey.
Start implementing these practices today, and you’ll notice immediate improvements in file performance, drawing clarity, and overall workflow efficiency. Clean files lead to cleaner designs—and that’s a goal worth pursuing in any CAD project.