AutoXChange 2026 offers powerful drawing management capabilities, but its text rendering is only as good as the fonts available on your system. While the application comes with a built-in stick font for basic use, leveraging your own font libraries can significantly enhance the visual quality and compliance of your technical documents. Understanding the distinction between the two primary font types—TrueType (TTF) and SHX—and knowing how to properly install them on your operating system is crucial for any professional working with CAD data.
This guide provides a detailed walkthrough for installing both TTF and SHX fonts on Windows and Linux systems, ensuring that AutoXChange 2026 can access and utilize them correctly.
Understanding Font Types in CAD Workflows
Before diving into the installation steps, it is essential to understand the two types of font files you will encounter in AutoCAD-based environments like AutoXChange 2026.
SHX (AutoCAD Compiled Shape File) is the legacy font format that has been the standard in AutoCAD for over three decades. These files are derived from .SHP (Shape) files that are processed into a compiled .SHX format. SHX fonts are known for their simplicity, small file size, and consistent appearance across different CAD platforms, making them reliable for technical drawings that require exact shape definitions.
TrueType Fonts (TTF) represent a more modern standard originally developed by Apple and later adopted as the primary font system for Windows and Linux. Unlike SHX fonts, which are often simpler, TTF files are vector-based and scale smoothly to any size without losing quality. They support advanced typographic features and are widely used for general documentation and annotations. However, their integration into CAD systems requires proper installation at the operating system level to ensure they are recognized by applications like AutoXChange.
Installing TrueType (TTF) Fonts
The installation process for TTF files differs significantly between Windows and Linux due to their distinct system architectures. A TTF file that is merely copied to a directory may not be usable until it has been registered with the operating system.
Windows TTF Installation
On Windows, TrueType fonts must be installed via the operating system’s font management interface to update the System Registry. Simply placing the file in the Windows Fonts directory without this step will not make it functional for AutoXChange 2026.
The process begins by locating the TTF file in Windows Explorer. Once found, you can initiate the installation by right-clicking on the font file. From the context menu, select either “Install” to install the font for your current user profile, or “Install for all users” if you have administrative privileges and want the font available system-wide.
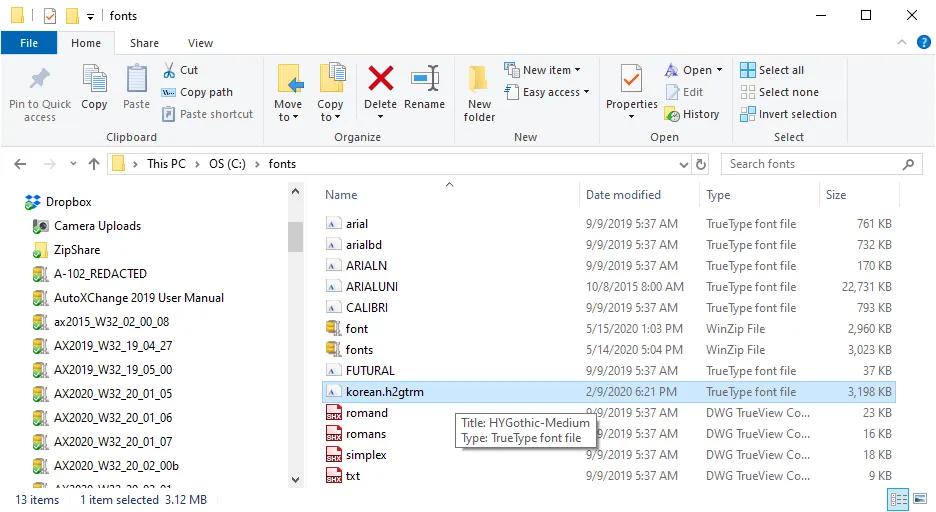
After selecting the appropriate option, Windows will handle the registry updates and copy the font to the correct system directory. The font is now ready for use. No restart is typically required for the font to be recognized by AutoXChange, though you may need to close and reopen the application if it was running during the installation.

Linux TTF Installation
Linux systems manage fonts through FontConfig, a powerful and flexible library designed to configure and customize font access. FontConfig is pre-installed on most major distributions, such as Ubuntu, Debian, Red Hat, and CentOS. If it is missing, it can be installed using the standard package manager for your distribution (e.g., apt for Debian-based systems or yum for Red Hat-based systems).
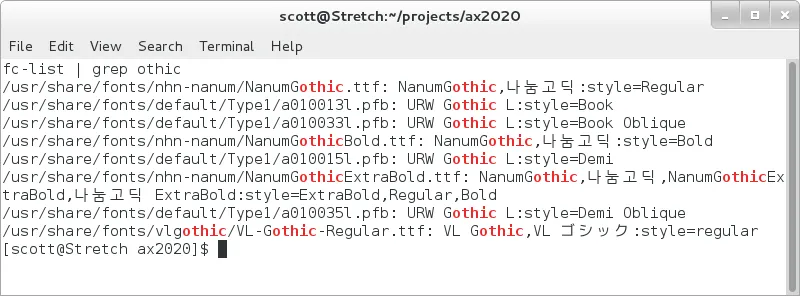
The first step is to verify whether the font you intend to install is already available on the system. You can list all installed fonts and filter the output for a specific name using a command like fc-list | grep -i "fontname" in the terminal. This helps avoid duplicate installations and confirms if the font was previously added.
To install a new font, you must copy the TTF file (e.g., whatever.ttf) to the /usr/share/fonts directory. This directory is the system-wide location for fonts. After copying the file, you need to update the font cache by running the fc-cache command. This command scans the font directories and builds the cache files that applications use to access fonts.
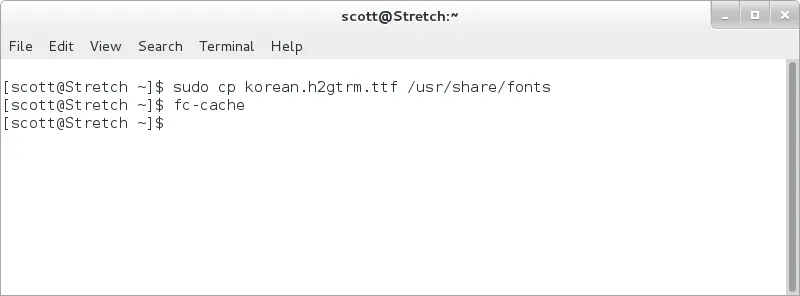 Terminal session showing the cp command to move a TTF file to /usr/share/fonts and the subsequent fc-cache command to update the font system
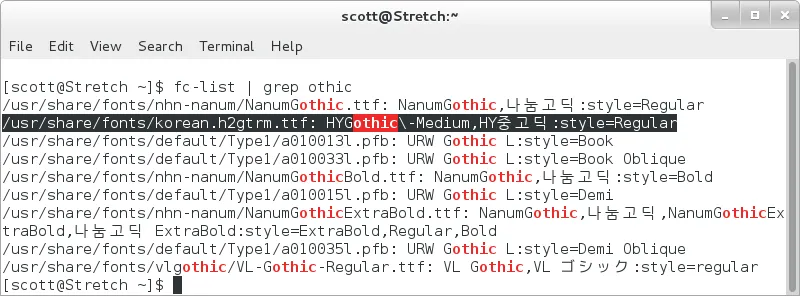
After running fc-cache, it is good practice to verify the installation by listing the fonts again. Using fc-list | grep -i "fontname" will confirm that the system now recognizes the new font. Once this is verified, the font is available for AutoXChange 2026 to use.
Installing SHX Fonts for AutoXChange
The process for adding SHX fonts is distinct from that of TrueType fonts and is consistent across both Windows and Linux systems. SHX fonts are not installed via the operating system’s font manager. Instead, AutoXChange 2026 locates them through specific directories defined by its configuration.
The primary method is to use the fontpath parameter, which can be set to point to a custom directory containing your SHX files. If the fontpath is not defined, the application will search in several default locations. These include the directory where the drawing file is located, the directory where the AutoXChange executable is installed, and any fonts subdirectory within these paths. For example, on any system, valid locations could be:
c:executablec:drawingc:executablefontsc:drawingfonts
By placing your SHX files in one of these locations, AutoXChange 2026 will automatically detect and use them when rendering text in your drawings.
Conclusion
Proper font management is a fundamental aspect of ensuring that your technical drawings and documents processed by AutoXChange 2026 are displayed exactly as intended. By understanding the differences between SHX and TrueType fonts, you can effectively expand your typographic toolkit.
For Windows users, installing TTF files requires a simple right-click installation to register the font with the system. For Linux users, the process involves using FontConfig commands to copy the file and update the font cache. Conversely, SHX fonts bypass the operating system entirely and rely on specific file paths defined by AutoXChange. Mastering these installation techniques allows you to maintain consistency, compliance, and professionalism across all your CAD-related outputs, ensuring that AutoXChange functions at its full potential within your existing technical workflow.