Wall paneling has surged in popularity, becoming a highly sought-after DIY trend, especially fueled by its widespread adoption on platforms like TikTok. This guide aims to simplify the process, empowering homeowners to add character and a unique finish to their living spaces without an exorbitant cost.
What You’ll Need
Before embarking on this transformative project, gather the following materials:
- MDF sheets
- Tape measure
- Pencil
- Sander
- Spirit level
- Filler
- Sandpaper
- Hammer
- Paint
Step 1: Design and Planning
The initial and crucial step involves precise measurement and design. Sketching your desired paneling style, whether a minimalist or intricate geometric pattern, will provide a clear visual roadmap and prevent mid-project indecision. This planning phase ensures you have a solid concept before committing to cuts and installations.
Step 2: Accurate Wall Measurements
Once your design is conceptualized, meticulously measure the wall’s length and width. Record these dimensions alongside your sketches. With your design in hand, determine the number of panels required and the desired width for your stiles (the wooden elements that create the panel effect). These measurements are critical for cutting the correct length of rails and ensuring a seamless fit.
Step 3: Material Quantity Calculation
To avoid over or under-purchasing materials, precise calculations are necessary. For horizontal rails, multiply the stile width by the number of columns envisioned in your design. Subtract this total from the wall’s width, then divide by the number of panels to determine the perfect amount for your horizontal stiles. For vertical stiles, combine the depth of the base and top rails. Subtract this from the wall height to ascertain the exact length needed for your vertical components.
Step 4: Wall Preparation
Addressing any existing wall imperfections, such as dampness or plaster issues, is paramount before attaching panels. Failing to do so can lead to complications. Additionally, sanding the wall surface will significantly improve the adhesion of your chosen glue or adhesive, ensuring a durable finish.
Step 5: Installing the Base Rails
Begin the installation process with the bottom rail. Apply adhesive generously to the back of the rail and press it firmly against the wall. Utilize a spirit level to guarantee it is perfectly straight. Allow this section to dry completely before proceeding.
Step 6: Attaching Top Rails and Stiles
After the bottom rail has dried, repeat the process for the top rails. Once secured and dry, the pre-cut vertical stiles can be precisely slotted between the top and bottom rails, ensuring a neat and integrated appearance.
Step 7: Spacing and Securing Stiles
As you continue, use the markings made on the wall during the planning phase to ensure each stile is perfectly spaced. Secure each stile firmly until you achieve the desired number of columns, maintaining the integrity of your design.
Step 8: Incorporating Horizontal Rails and Filling Gaps
With the vertical stiles in place, it’s time to add the horizontal rails between them. These can be attached using adhesive or, if necessary, small pins. Subsequently, inspect your paneling for any small gaps between the elements. Apply a caulk to these spaces and allow it to dry, creating a smooth, continuous surface.
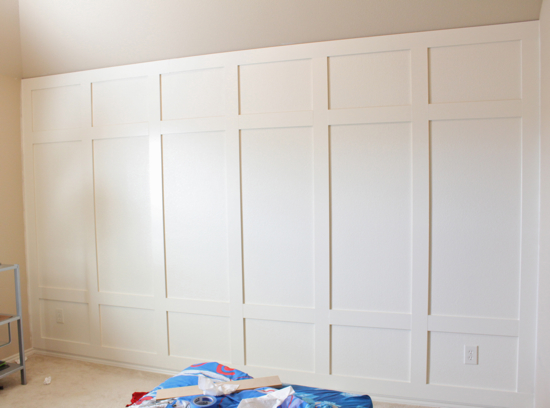
Step 9: Painting for a Polished Look
Once you are satisfied with the paneling’s appearance and all fillers have dried, it’s time for the finishing touch: painting. Choose a color that complements your home’s aesthetic from the vast array of options available. Using a roller is recommended for achieving an even and professional finish.
Step 10: Admire Your Handiwork
The process of installing wall paneling requires patience and attention to detail. Take a moment to appreciate the effort you’ve invested and the stunning, unique feature you’ve created for your home. This DIY project not only enhances your living space but also offers a rewarding sense of accomplishment.