Drawing a charming cartoon “pretty girl” is simple when you break the process into clear, repeatable steps. This tutorial walks English-speaking beginners through each stage—from facial features to finishing color—using easy shapes and techniques. The primary keyword “How to Draw a Pretty Girl” appears early to match search intent for an informational drawing guide.
Introduction
How to Draw a Pretty Girl is a beginner-friendly, step-by-step drawing tutorial designed to help anyone create a polished, attractive cartoon portrait. This guide emphasizes simple shapes, clear line work, and basic shading so learners can reproduce a pleasing face with expressive eyes, flowing hair, and graceful posture. Follow each stage in order and adapt details (hair color, eye shape, expression) to make the character your own.
Materials and Preparation
- Pencil (HB or 2B), eraser, fine liner or ink pen
- Drawing paper or sketchbook
- Colored pencils, markers, or digital painting tools for coloring
- Optional: reference images for eye shapes, hairstyles, and clothing
Step 1 — Draw the Eyes and Pupils
Start with the eyes because they establish the character’s expression. Use gentle curved lines for the upper and lower eyelids, leaving a small gap at the corners so the lines don’t fully meet. Inside each eye, draw two partial concentric circles: the larger for the iris and a smaller filled circle for the pupil. Leave a small white highlight to make the eyes look lively.
Step 2 — Add Eyelashes and Eyebrows
Define the brows with thicker, curved strokes that follow the brow ridge. Add long, slightly tapered eyelashes using confident strokes that flare outward from the upper lid. Use short curved lines above and below the eyes to indicate eyelids and subtle shading.
Step 3 — Shape the Nose and Mouth
Form the nose with three short curved lines: a tip line and two small curves for the nostrils. For the mouth, draw a long horizontal curve for the mouth opening, then add softer curved lines above and below to create upper and lower lips. Place small crease lines at the corners of the mouth for realism.
Step 4 — Outline the Face and Hairline
Sketch the face’s outer contour with long, smooth curves for the cheeks and jaw. For a graceful look, keep the chin slightly rounded. Begin the hairline with flowing curved strokes that don’t fully connect at the crown; this creates a natural part and volume.
Step 5 — Build Long Hair Volume
Extend overlapping curved lines from the hairline to form long locks. Vary the line thickness and the direction of curves to suggest layered hair and movement. Allow some strands to cross over the face edge to frame it attractively.
Step 6 — Texture Hair and Draw the Hand
Add hair texture by drawing gentle curved lines that follow the hair’s flow. When adding a hand near the face, sketch a curved line for the palm and double it back to indicate a finger and the hand’s edge. Keep fingers slightly tapered and simplified for a cartoon style.
Step 7 — Complete the Hand and Arm
Add another finger and a thumb with doubled-back curved lines, extending the thumb line into a forearm outline. Continue the arm down the page if the design requires it, keeping proportions consistent with the head and shoulder width.
Step 8 — Neck and Shoulders
Extend curved lines below the head to form a slender neck and gentle shoulders. Add a curved neckline to indicate a shirt or dress. Keep neck proportions slightly elongated for an elegant, stylized appearance.
Step 9 — Final Hair Details and Outfit
Finish hair texture with additional curved and slight zigzag lines for natural ends. Add clothing details: a collar, shirt neckline, or simple patterns. Ensure these elements support the portrait without distracting from facial features.
Coloring Tips
- Choose a hair color that complements the overall design—brunette, blonde, black, or playful bright colors like pink or blue.
- Select eye color (brown, blue, green, gray, or violet) and add highlights to maintain shine.
- Use soft shading on the lips, cheeks, and under the chin to add dimension.
- Blend colored pencil strokes or use smooth digital brushes for a clean finish.

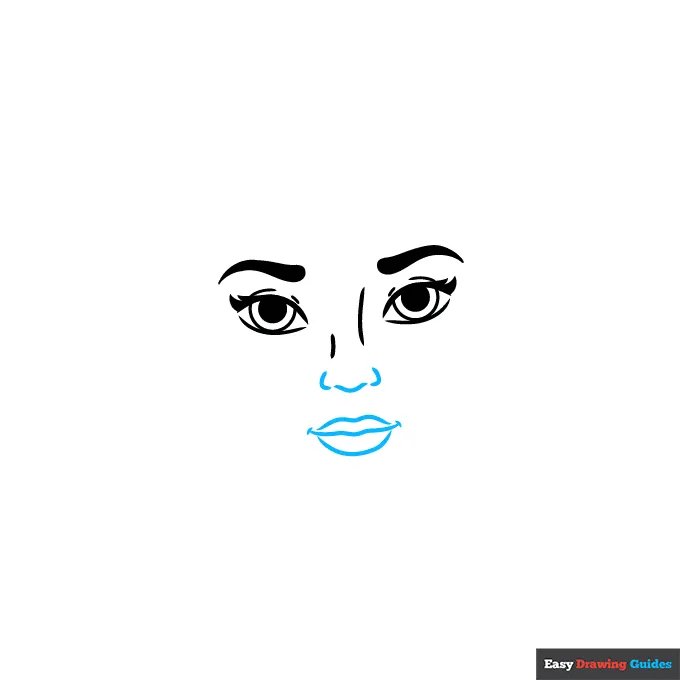 Pretty Girl step-by-step drawing tutorial: step 3
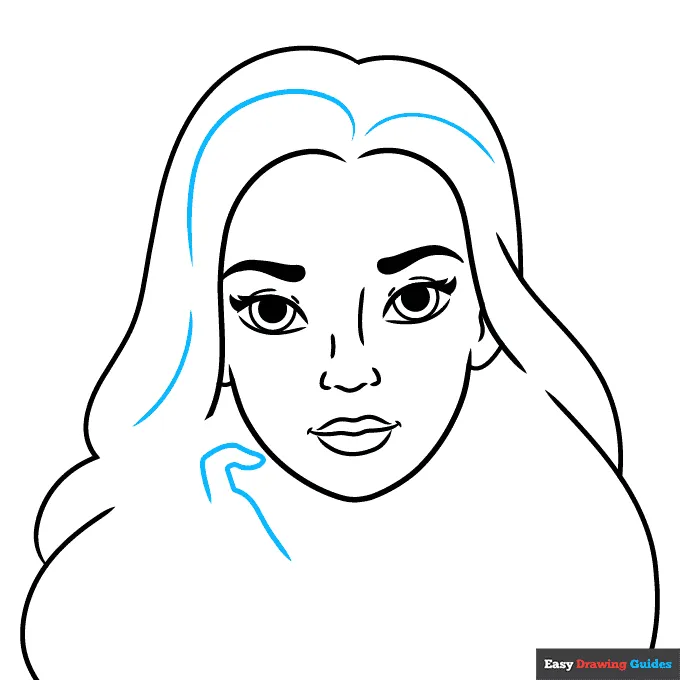 Pretty Girl step-by-step drawing tutorial: step 6
Style and Proportions Notes
- Emphasize large, expressive eyes and full lips to achieve a conventionally “pretty” cartoon look.
- Keep lines clean and confident; avoid over-detailing for a fresh, youthful style.
- Adjust proportions: slightly longer necks and larger eyes create a stylized, approachable character.
Examples and Variations
- Try different hairstyles (curly, wavy, bob) while keeping the same facial structure for quick character variants.
- Experiment with accessories: a headband, earrings, or glasses can change the personality instantly.
- Change expressions by altering eyebrow angle and mouth curvature.
Conclusion
This How to Draw a Pretty Girl tutorial guides beginners through a logical sequence of steps that produce a polished cartoon portrait. By focusing on eyes, hair flow, and smooth facial contours, you can create an expressive and attractive character. Practice each step, customize features to reflect your vision, and try coloring variations to expand your skill set. If you enjoyed this guide, try more people-drawing tutorials to develop versatility and confidence in portrait drawing.
References
- Easy Drawing Guides. (2022). How to Draw a Pretty Girl. https://easydrawingguides.com/how-to-draw-a-pretty-girl/
- Easy Drawing Guides. (Collection). Easy People Drawing Guides. https://easydrawingguides.com/51-easy-people-drawing-ideas/