Creating and printing a full page of identical labels in Microsoft Word is quick and reliable. This guide explains each step clearly so you can produce consistent label sheets for addresses, product tags, or organization needs. Primary keyword: “print labels in Word”.
Introduction
Creating and printing labels in Word is a common office task that saves time when you need multiple identical stickers. This guide shows how to set up label dimensions, enter and format text, and print a full page of the same label, plus tips for one-off labels and Word for the web. The steps below assume you have Microsoft Word on a desktop (Windows or Mac).
Quick checklist (what you’ll need)
- A computer with Microsoft Word (desktop version)
- A label sheet (brand and product number) or the exact label dimensions for a custom sheet
- A printer compatible with your label sheets
Step-by-step: Create and print a full page of identical labels (desktop Word)
1. Open the Labels dialog
- In Word, go to the Mailings tab and click Labels.
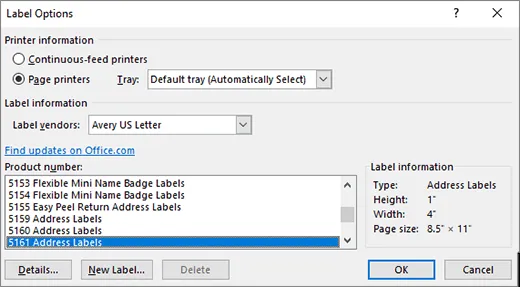
2. Choose label options
- Click Options.
- Set Label vendor and select the Product number that matches your label sheets.
- If your product number is not listed, click New Label and enter the exact dimensions (page size, label height/width, number across, number down, margins, and pitch). Save the custom label.
 Label options dialog
3. Enter the label content
- In the Labels dialog, type the address, name, or other text into the Address box (text only).
- To use contact information already stored in your contacts, choose Insert Address.
 Envelope and labels dialog – labels
 Envelope and labels dialog – labels
4. Format the label text
- Select the text inside the Address box, right-click, and choose Font or Paragraph to change size, style, or alignment.
- Make sure font size and alignment fit the label dimensions to avoid clipping.
5. Specify printing a full page of the same label
- In the Labels dialog, select Full page of the same label.
- Click Print to send the labels to the printer immediately, or click New Document to create a Word document containing a full sheet of the identical label that you can edit, save, or preview before printing.
Printing one label or a single position
- If you need only one label on a sheet, open Mailings > Labels, choose Single label, then set the row and column position for the label on the sheet.
- Click OK, choose your printer or Save, and then print the single label.
Alternative: Use Word for the web (template method)
- Word for the web does not directly support the Labels dialog; instead:
- Open Word for the web and choose a label template (select More templates if needed).
- Fill out one label on the template, then copy and paste it across the sheet for a full page of identical labels.
- Tip: Print the template onto plain paper first to check alignment before loading label sheets into your printer.
Tips for accurate printing
- Always perform a test print on plain paper to confirm alignment with your label sheet.
- Verify printer tray settings and paper type to avoid jams or misfeeds.
- If labels contain graphics, ensure image resolution is high enough and embedded correctly.
When to use mail merge (multiple different labels)
- If you need many different labels (addresses from a list), use Mailings > Start Mail Merge > Labels, then use the mail merge tools to populate each label from a data source (Excel, Outlook contacts, etc.). For detailed mail merge workflows, consult Word’s mail merge documentation or help resources.
Conclusion
Following these steps lets you reliably create and print a full page of identical labels in Word or produce a single label in a specific position. For Word for the web, use templates and copy/paste. Test print on plain paper first to ensure alignment. Try it now: set your label product number, format the text, and print a full page of consistent labels.
References
- Microsoft support images and dialogs used for illustration.