Installing Microsoft Office 2010 can be straightforward if you follow the right steps. This guide focuses on Office 2010 installation tips, covering both 32-bit and 64-bit versions, as well as customizing your installation to include only the applications and features you need.
Installing the 32-bit (Default) Version of Office 2010
The 32-bit version is installed by default due to compatibility with most add-ins and legacy applications. Follow these steps to install it:
- Insert the Office 2010 disc into your computer’s drive. If the setup wizard does not start automatically, navigate to the disc and double-click SETUP.EXE.
- Enter your product key when prompted.
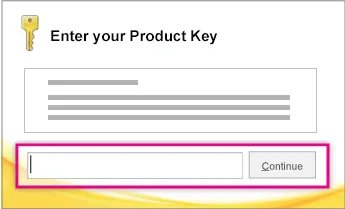
If you need assistance, refer to Finding your Office 2010 product key.
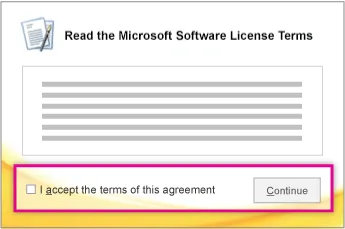
3. Accept the Microsoft Software License Terms and click Continue.
- Follow the prompts to complete installation and click Close.

- Activate Office over the Internet to enable full functionality.
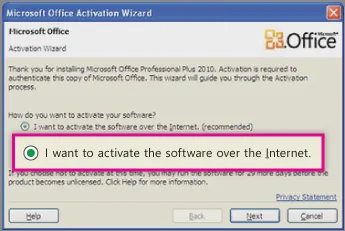 Activate the software over the Internet
If activation is skipped during setup, you can activate later by opening any Office application and selecting File > Help > Activate Product Key.
Installing the 64-bit Version of Office 2010
The 64-bit version is ideal for users who work with very large Excel spreadsheets, Access databases, or need more than 2 GB of memory per application. Before installing:
- Ensure your system is running 64-bit Windows (Check your Windows version).
- Uninstall any 32-bit Office version (Uninstall Office 2010).
- Confirm that your essential add-ins are compatible with Office 2010 64-bit.
Steps to install:
Insert the Office 2010 disc.
Open the x64 folder in the disc root and double-click setup.exe.
Complete the installation following the prompts, entering your product key as needed.
Custom Installation: Installing or Removing Specific Office Programs
Office 2010 allows selective installation of applications such as Word, Excel, or Outlook:
- Start the Office suite installation.
- Choose Customize in the Choose the installation you want dialog.
- Right-click programs you do not wish to install and select Not Available.
- Click Install Now to complete the custom setup.
Note: After the suite is installed, individual programs cannot be removed without uninstalling the entire suite and reinstalling with a custom setup.
Custom Installation: Managing Individual Components
If a feature is not installed automatically, follow these steps:
Close all Office programs.
Open the Control Panel:
- Windows 7/Vista: Programs > Programs and Features, select Office suite, click Change.
- Windows XP: Add or Remove Programs, select Office suite, click Change.
In the Office Setup dialog, select Add or Remove Features and click Next.
Choose how each feature is installed:
- Run from My Computer: Installs feature locally.
- Run all from My Computer: Installs feature and all subfeatures.
- Installed on First Use: Installs feature upon first usage.
- Not Available: Feature will not be installed.
Use the keyboard or mouse to expand folders and adjust subfeatures as needed.
Click Upgrade if an older version is detected, or Install Now otherwise.
Conclusion
Installing and customizing Office 2010 ensures that your software meets your workflow needs. Whether you choose the 32-bit default for compatibility or the 64-bit version for performance, custom installations allow you to install only the programs and features you use most. After installation, remember to activate Office to maintain full functionality. Explore selective features and adjustments to optimize your Office experience today.