A floor plan is more than just a visual representation of a space—it is a scaled diagram that serves as the blueprint for architectural and interior design projects. However, without dimensions, even the most detailed floor plan remains incomplete. Dimensions provide the critical measurements that define the size of rooms, the spacing between walls, and the placement of structural elements. They transform a simple sketch into a precise, actionable document, ensuring accuracy in planning, construction, and execution.
For professionals and hobbyists alike, AutoCAD is the go-to software for creating dimensioned floor plans. Whether you’re designing a residential layout or a commercial space, mastering the art of adding dimensions in AutoCAD is essential. Below, we break down the process into clear, actionable steps to help you achieve accuracy and efficiency in your designs.
Why Dimensions Matter in AutoCAD
Dimensions in AutoCAD are not just lines and numbers—they are the language of precision. They communicate the exact size and position of every element in your design, eliminating guesswork and ensuring that your vision is executed flawlessly. Without dimensions, a floor plan lacks the technical clarity required for construction, fabrication, or even simple space planning.
In architectural and engineering workflows, dimensions serve multiple purposes:
- Clarify intent: Ensure that builders, contractors, and designers interpret the plan correctly.
- Avoid errors: Minimize costly mistakes during construction by providing exact measurements.
- Streamline collaboration: Facilitate seamless communication between architects, engineers, and clients.
Step-by-Step Guide to Adding Dimensions in AutoCAD
1. Open or Create a Drawing
Begin by launching AutoCAD and either opening an existing drawing or creating a new one. If you’re starting from scratch, use the NEW command to initiate a blank workspace. For existing projects, the OPEN command will allow you to access your saved files.
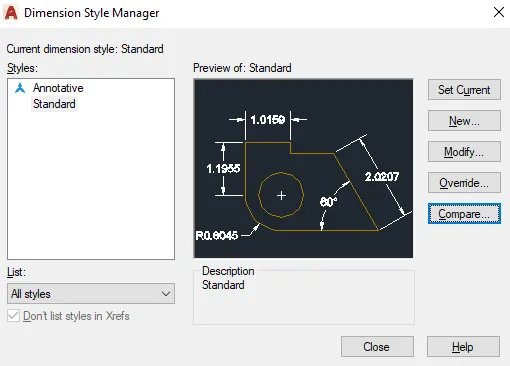
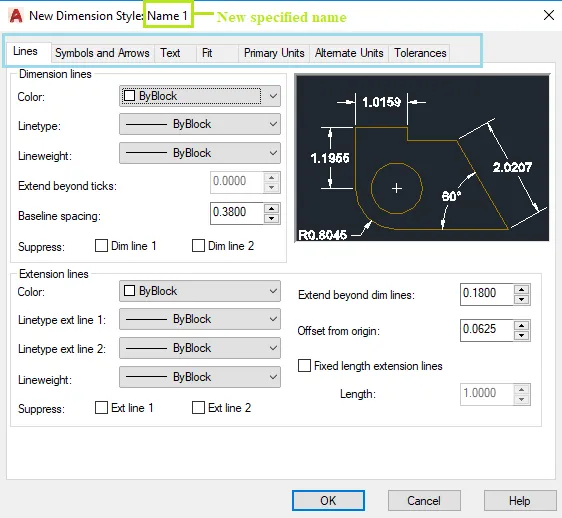
2. Set Your Dimension Style
Dimensions in AutoCAD are controlled by dimension styles, which define the appearance and behavior of dimension lines, text, arrows, and other elements. To customize these settings:
- Type
DIMSTYLEin the command line and press Enter. - The Dimension Style Manager dialog box will appear.
- Click New to create a custom style or select an existing one from the list.
- Adjust parameters such as:
- Text height: Ensures readability (e.g., 2.5mm or 0.1 inches).
- Arrowhead style: Choose between closed, open, or architectural ticks.
- Dimension lines: Set color, linetype, and extension beyond the dimension text.
- Precision: Define the number of decimal places for measurements.
- Click OK to save your changes.
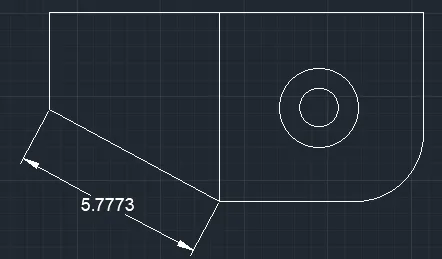
3. Place Your Dimensions
With your dimension style set, you’re ready to add dimensions to your floor plan:
- Type
DIMin the command line and press Enter. - Select the objects (e.g., walls, doors, windows) you want to dimension.
- Click to specify the location of the dimension line. AutoCAD will automatically generate the dimension based on your selection.
- Repeat the process for additional dimensions, ensuring all critical measurements are included.
4. Modify Dimensions as Needed
Mistakes happen, and designs evolve. Fortunately, AutoCAD makes it easy to edit dimensions after placement:
- Select the dimension(s) you want to modify.
- Right-click and choose Properties, or type
DDEDITin the command line and press Enter. - Adjust properties such as:
- Text size: Increase or decrease for better visibility.
- Precision: Add or remove decimal places.
- Style: Switch to a different dimension style if required.
- Click OK to apply your changes.
5. Save Your Drawing
Once you’ve added and fine-tuned all dimensions, save your work to preserve your progress. Use the SAVE command or the shortcut Ctrl + S to ensure your dimensioned floor plan is stored securely.
Pro Tips for Professional Results
- Consistency is key: Use the same dimension style throughout your drawing to maintain a uniform appearance.
- Avoid clutter: Space dimensions evenly to prevent overlapping lines and text, which can make your plan difficult to read.
- Use layers: Organize dimensions on a separate layer (e.g., “DIMENSIONS”) for easier management and visibility control.
- Check scale: Ensure your dimensions match the scale of your drawing to avoid discrepancies between the plan and real-world measurements.
Conclusion: Elevate Your Designs with Precise Dimensions
Dimensions are the backbone of any technical drawing, and in AutoCAD, they are your tool for achieving precision and professionalism. By following the steps outlined above, you can create floor plans that are not only visually clear but also technically accurate, ensuring smooth execution from concept to construction.
Ready to take your AutoCAD skills to the next level? Start by practicing these dimensioning techniques in your next project and experience the difference that meticulous attention to detail can make. For more advanced tips, explore AutoCAD’s help documentation or join online communities like the Autodesk Knowledge Network. Happy designing!