As autumn turns to winter and preparations for Autodesk University 2016 wrap up, it’s the perfect time to share one more practical AutoCAD tip. One question that frequently comes up among CAD users is how to manage AutoCAD custom hatch patterns and populate the Custom tab inside the Hatch Pattern Palette. Fortunately, the process is straightforward and can make your workflow significantly more efficient.
Whether you’re working with architecture, civil engineering, or manufacturing drawings, keeping favorite hatch patterns organized can save valuable time and improve consistency across projects.
Understanding Where AutoCAD Hatch Patterns Are Stored
AutoCAD stores hatch definitions in files such as ACAD.PAT and ACADISO.PAT. These pattern files can be edited using a text editor like Notepad. Custom pattern definitions are typically added at the end of the file and follow a structure similar to:
*MYNAME, DESCRIPTIONfollowed by the pattern data itself.
For example, a pattern named EARTH can be defined and saved alongside existing AutoCAD patterns. Although modifying the default PAT files is possible, many users prefer maintaining separate custom pattern files for easier management and backup.
Opening Hatch Settings
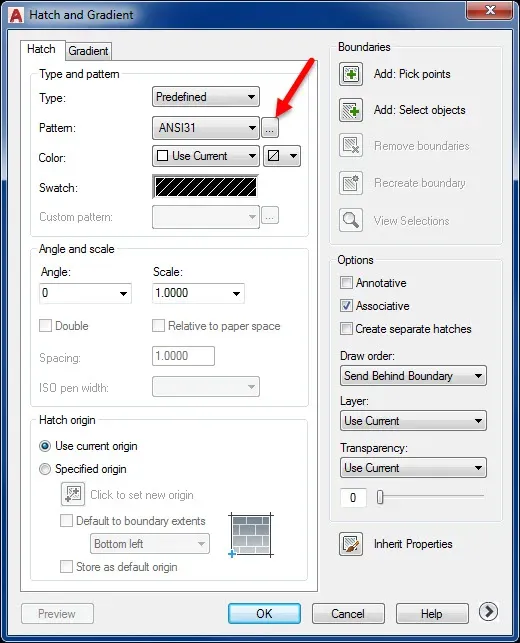
To access hatch settings:
- Select Hatch from the Ribbon.
- Alternatively, type HATCH at the command line.
- Enter T to open the Hatch and Gradient settings dialog.
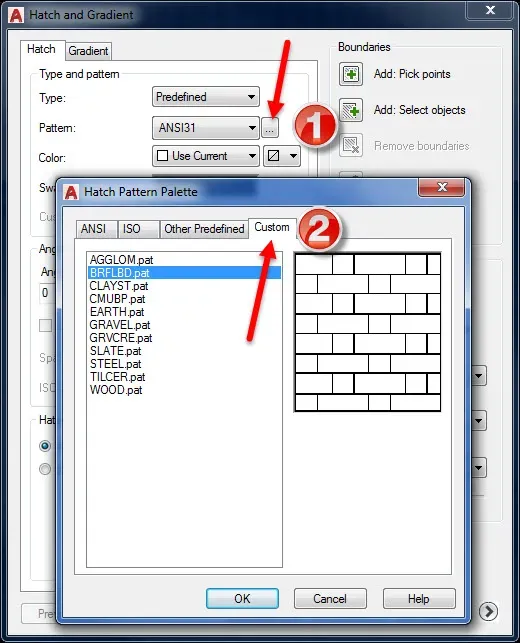
After opening the dialog, use the ellipsis button beside the pattern name to access the Hatch Pattern Palette.
The Hatch Pattern Palette contains several tabs, including a Custom tab where user-defined patterns can appear.
Why the Custom Tab Is Empty
When opening the Hatch Pattern Palette for the first time, many users notice that the Custom tab contains no entries. This is normal because AutoCAD only displays patterns located in folders included in its Support File Search Path.
To populate this section, you need a dedicated folder containing your downloaded or created hatch pattern files.
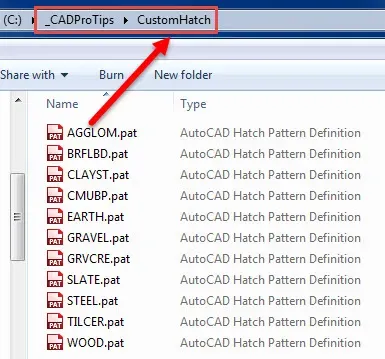
Creating a Folder for Custom Hatch Files
A practical approach is to create a folder on your local drive or network location. In this example, the folder is named:
CustomHatchPlace all downloaded PAT files inside that directory. Keeping custom files in one location makes administration and sharing much easier.
After organizing the files, AutoCAD must be instructed to search that location.
Adding the Folder to the Support File Search Path
Open AutoCAD and type:
OPTIONSYou can also right-click inside the command area and choose Options.
Within the Options dialog:
- Select the Files tab.
- Expand Support File Search Path.
- Click Add.
Browse to the CustomHatch folder and add it to the list. AutoCAD places new paths at the bottom, but it’s often beneficial to move the folder toward the top of the search order to avoid conflicts with other custom resources.
Afterward, click Apply and OK to save the settings.
Viewing Your Custom Hatch Patterns
Return to the command line and launch the Hatch command again. Open the settings and navigate to the Custom tab.
You should now see your user-defined patterns listed and ready for use.
Separating frequently used patterns into their own folder provides quick access and simplifies file management. The Hatch and Gradient dialog also allows you to configure:
- Annotative hatches
- Associative hatches
- Default hatch layers
- Scale and angle settings
Accessing Custom Patterns from the Ribbon
Custom hatch definitions are not limited to the palette. They also appear in the Ribbon.
Under the pattern drop-down list, choose User Defined, and your custom patterns become available in the current drawing environment.
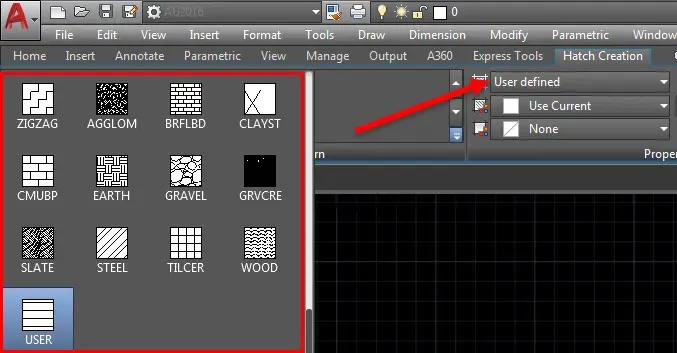 User-defined hatch patterns accessible directly from the Ribbon interface
This provides a convenient workflow for users who rely heavily on repetitive drafting tasks and standardized drawing practices.
Looking Ahead to Autodesk University 2016
With conference preparations complete and handouts uploaded, Autodesk University 2016 promises another opportunity to reconnect with colleagues, discover new technologies, and exchange ideas with CAD professionals worldwide.
Three classes are featured this year:
CSI: CAD Standards Implementation
This session focuses on creating and auditing CAD standards through .DWS files. Attendees learn how to compare drawings against standards and identify non-compliant elements efficiently.
Pumping Up Productivity in the LAB with Macros
The class explores the Customized User Interface (CUI) and demonstrates how command macros can be modified and enhanced to automate repetitive tasks and boost productivity.
Advanced Topics Using the Sheet Set Manager
The Sheet Set Manager remains one of AutoCAD’s most powerful productivity tools. Despite being available for over a decade, many users still overlook its capabilities. This session highlights techniques that streamline project organization and sheet management.
Final Thoughts
Managing AutoCAD custom hatch patterns is a simple but effective way to improve drafting efficiency. By storing PAT files in a dedicated folder and adding that location to the Support File Search Path, you can populate the Custom tab and access favorite patterns quickly through both the Hatch Palette and the Ribbon.
Small workflow enhancements like these can make a substantial difference in daily CAD production. Continue exploring AutoCAD’s customization features, and don’t hesitate to take advantage of training resources, conferences, and advanced tools to maximize productivity.
References
- Autodesk Knowledge Network – Installing custom hatch patterns in AutoCAD.
- Autodesk University 2016 course materials and handouts.
- AutoCAD Help Documentation.
- CAD workflow and customization best practices for professional drafting environments.