The Barcode Add-In for Microsoft Excel and Word provides a streamlined solution for generating professional barcodes directly within your Office documents. This powerful tool enables users to create static and dynamic barcodes with a single click, eliminating the need for complex manual formatting or external barcode generation software. Whether you’re creating product labels, inventory management systems, or mail merge documents, this add-in simplifies the barcode creation process for Windows and Mac users running Office 2003 through 2010.
Important Note: This is a legacy product compatible only with Office 2010 and earlier versions. For Office 365, 2013, 2016, and later versions, alternative solutions like VBA modules are recommended.
Key Features and System Requirements
The Barcode Add-In offers comprehensive functionality for barcode generation across Microsoft Office applications:
- One-click barcode generation after highlighting data to be encoded
- Bulk conversion of entire data columns or rows to barcodes
- Royalty-free usage with purchase of any IDAutomation barcode font package
- Universal font support including all linear and 2D barcode fonts, DataBar, and IDAutomation Universal fonts
- Cross-platform compatibility with Word & Excel 2003, 2007, and 2010 for Windows, plus Word & Excel 2004 and 2011 for Mac OSX
Critical Installation Requirements:
- Windows Users: The barcode add-in toolbar will not appear unless associated barcode fonts are installed first
- Mac Users: The add-in will encode data but won’t generate readable barcodes without the appropriate font installed
Installing the Barcode Add-In for Windows
Before beginning installation, ensure you have the necessary barcode fonts installed on your system. The add-in requires these fonts to function properly and display the toolbar interface.
Download and Installation Process:
- Download the Barcode Add-in for Word and Excel package from the official source
- Extract the downloaded ZIP file
- Run the installation process
- Open Word or Excel to verify the add-in toolbar appears in the Add-Ins tab
Compatibility Warning: The Barcode Add-in does not work with online versions of Office 365 or versions released after Office 2013. For these newer versions, the VBA Module solution is the recommended approach for natively installed Office applications.
Installing the Barcode Add-In for Mac
The Mac installation process requires careful attention to folder placement based on your Office version. Follow these steps precisely to ensure proper functionality:
Install barcode fonts first if not already present on your system
Close all instances of Word and Excel completely
Download and extract the Add-in for Word and Excel, then open the Mac folder
Copy files to appropriate locations based on your Office version:For Office 2004:
- Copy IDAutomation_Excel_Addin.xla to Applications/Microsoft Office 2004/Office/Add-ins folder
- Copy IDAutomation_Word_Addin.dot to Applications/Microsoft Office 2004/Office/Startup/Word folder
For Office 2011:
- Copy IDAutomation_Excel_Addin.xla to Applications/Microsoft Office 2011/Office/Add-ins folder
- Copy IDAutomation_Word_Addin.dot to Applications/Microsoft Office 2011/Office/Startup/Word folder
Enable the add-in in Excel:
- Open Excel and navigate to the Tools menu
- Select the Add-Ins option from the dropdown menu
Activate the add-in:
- Ensure the IDAutomation_Excel_Addin.xla option has a checkmark
- This enables the add-in toolbar within Excel
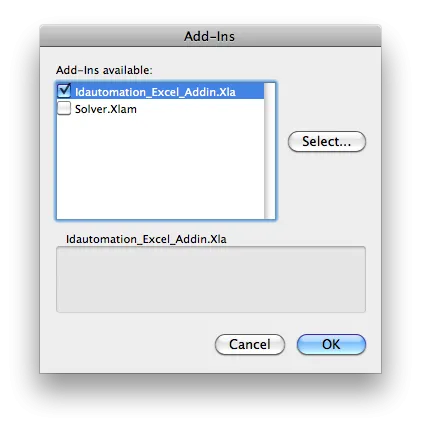
Once activated, the toolbar provides easy barcode generation with a single button click. Remember that without an installed IDAutomation font (licensed or demo), you’ll only see encoded data rather than readable barcodes.
Creating Barcodes in Microsoft Word
This comprehensive tutorial demonstrates how to create static barcodes in Microsoft Word documents using the add-in functionality.
Step-by-Step Word Barcode Creation
- Install required barcode fonts on your system if not already present
- Download and install the Barcode Add-in to enable the toolbar
- Open a Word document – the add-in toolbar should appear in the Add-Ins tab
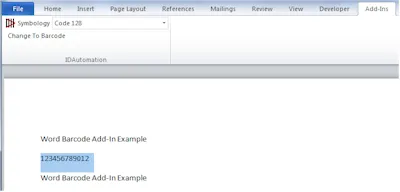
- Highlight the data that will be encoded in the barcode
- Generate the barcode based on your Word version:Microsoft Word 2003:
- With data highlighted, select the appropriate barcode font from the list
- Multiple barcode fonts will appear if installed on your system
Microsoft Word 2007 through 2013:
- Select your preferred barcode font from the dropdown list
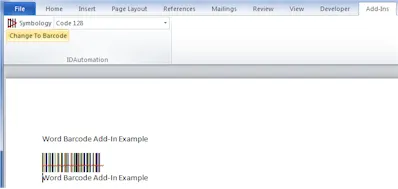
- Click the Change To Barcode button to encode and generate
Microsoft Word 2004 or 2011 for Mac:
- Click the button corresponding to your desired barcode type
- The barcode font applies only if properly installed
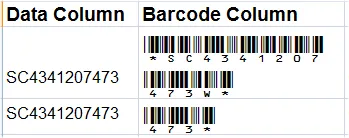
- Review the generated barcode – the data is now formatted for the selected barcode type. When the appropriate font is applied, an accurate scannable barcode displays.
Important: Once data is formatted and converted to a barcode, it cannot be modified to another barcode type directly. To change barcode types, use the undo button repeatedly until the data returns to its original format, then reapply the new barcode type.
- Test your barcode by printing and scanning to verify correct data encoding. IDAutomation offers USB barcode scanners for verification if needed.
- Embed fonts for distribution – When sharing Word documents, embed the font so recipients can view barcodes without installing the font package. This requires at minimum a Developer License for the associated font.
Creating Dynamic Barcodes with Word Mail Merge
Generating dynamic barcodes through mail merge combines Excel data management with Word document formatting. This process creates personalized documents with unique barcodes for each recipient or record.
Mail Merge Barcode Creation Process
The mail merge workflow uses the add-in to encode data in Excel, then merges this encoded data into Word documents where the barcode font is applied to the merged fields.
- Install your chosen barcode font if not already present
- Download and install the Barcode Add-In for Word & Excel
- Create an Excel spreadsheet to serve as your mail merge data source
- Position barcode columns in the far-right column of your spreadsheet
- The formula in this column should contain the data requiring barcode encoding
- Title Row 1 as “Barcode Column”
- Convert data to barcodes in Excel:
- Select the entire barcode column (excluding Row 1)
- Choose the appropriate barcode type from the toolbar
- Click to convert the entire column
- Save your spreadsheet with the encoded barcode data
- Execute the Word mail merge process:
- When prompted to “select recipients” or choose a “data source,” select your Excel spreadsheet
- Position the cursor where the barcode should appear
- Insert the Barcode Column field

Apply the barcode font:
- Select the entire merge field (including the arrow indicators)
- Right-click and choose the appropriate barcode font
- Ensure the font type matches the button selected in Excel Step 5
Complete the mail merge – barcodes will generate in the merge fields with the applied barcode font
Verify barcodes by printing and scanning to ensure correct data encoding
Distribution requirements:
- Embed the font in Word documents
- Ensure the Excel data source remains accessible
- A Developer License minimum is required for this distribution method
Creating Barcodes in Microsoft Excel
The Excel Barcode Add-In uses a unique methodology that converts selected cells, rows, and columns from data into functional barcodes. The dynamic nature of this solution means barcodes automatically update when underlying Excel data changes, utilizing formulas and functions for real-time accuracy.
Excel Barcode Creation Tutorial
- Install your preferred barcode font if not already on your system
- Download and install the Barcode Add-in to activate the toolbar
- Open an Excel spreadsheet – the Barcode Add-In toolbar should now be visible
- Select cells for barcode conversion:**Microsoft Excel 2003:**
- Click the button corresponding to your desired barcode type
- Available options depend on installed fonts
![]()
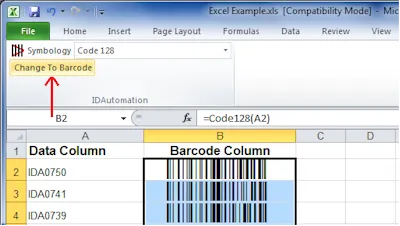
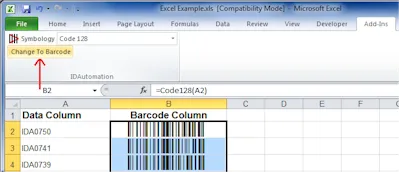
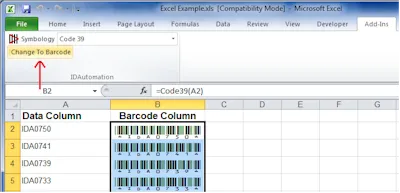
Microsoft Excel 2007 through 2013:
- Select barcode type from the Symbology dropdown list
- Click the Change To Barcode button

Important for Windows 8/Excel 2013: Excel 2013 on Windows 8 cannot access encoding routines to format data properly. To resolve this:
- Install barcode fonts
- Install the Barcode Add-In for Excel
- Import the VBA functions
Microsoft Excel 2004 or 2011 for Mac:
- Click the button for your desired barcode type
- Barcode font applies only if properly installed
![]()
Column Selection Tip: When selecting entire columns, allow a few seconds for calculation due to the large number of rows. Always deselect the header row to prevent it from converting to a barcode.
- Automatic function application – Once clicked, the appropriate function enters automatically, the font applies, and a readable barcode generates
- Changing barcode types:
- Select cells containing the existing barcode
- Windows 2003 or Mac 2004/2011: Select the appropriate button
- Windows 2007-2013: Choose another barcode type from the Symbology dropdown and click Change To Barcode
- Verify functionality by printing and scanning barcodes to ensure correct data encoding
Troubleshooting Common Issues
Toolbar and Installation Problems
The Add-In Toolbar Does Not Appear
A demo or purchased IDAutomation barcode font must be installed for the toolbar to display. If you installed the Add-in before the fonts, close all Microsoft Office instances, install the barcode font, then reopen Excel or Word to activate the add-in.
The Add-In Toolbar Does Not Appear for Additional Users on the Same PC
The add-in activates only for the user profile where installation occurred. Each user must install the add-in separately within their individual user profile.
There is No Button for the Desired Barcode Type
If your desired barcode button doesn’t appear, install the appropriate font and restart Word or Excel. For example, to enable the Code 39 button, install the Code 39 Fonts. In some cases, a full computer restart may be necessary to update cached components.
Barcode Display and Formatting Issues
Changing the Barcode Size
Modify barcode size by selecting a different font size or changing the point size:
- Highlight the entire barcode
- Right-click and change the point size or font height
- Common font heights range from XS (extra small) to L (large)
Barcode Appears Truncated or Wraps in Excel and Won’t Scan
This occurs when the column isn’t wide enough to contain the entire barcode. Simply widen the column as necessary to resolve this issue.
Red Line Appears in the Barcode
A red line may appear due to spell-checking. This is normal when the spell checker cannot associate the converted barcode with a defined word. The spellchecker symbol can be ignored as it doesn’t impact scanning functionality.
Horizontal Lines Appear or Barcode Splits with DataBar Stacked or 2D Barcodes
This may occur due to line spacing properties or text justification issues with fonts requiring multiple lines of encoding.
Rectangular Boxes or Strange Symbols Appear with Code-128-HR Button
The Code-128-HR button should not be used in Word Mail-Merge from Excel. Rectangular boxes indicate Unicode or double-byte incompatibility. Use the standard Code 128 button instead.
Advanced Configuration
ApplyTilde Required for GS1-128
When using the add-in, ApplyTilde is enabled by default, allowing GS1-128 barcodes to be easily generated in Word or Excel using the parentheses method. To encode the Tilde directly, use ~126.
The Undo Button Does Not Undo the Barcode
If undo doesn’t work, delete the barcode and create a new one using the same method.
Office 97 or Office 2000 Compatibility
For versions not mentioned in standard documentation, implement IDAutomation’s VBA Macros for compatibility.
Need More Barcode Functionality or Customization
Enhanced functionality and customization are available through IDAutomation’s VBA Macros, which are functions easily edited in Visual Basic code.
Conclusion
The Barcode Add-In for Microsoft Excel and Word remains a powerful solution for users running Office 2010 and earlier versions who need efficient barcode generation capabilities. With its one-click conversion, bulk processing features, and dynamic updating in Excel, this tool streamlines barcode creation for inventory management, product labeling, and mail merge applications.
While this is a legacy product with no ongoing support, it continues to serve users with older Office versions effectively. For those using Office 365, 2013, 2016, or later, transitioning to VBA module solutions is recommended for continued barcode functionality.
Ready to implement barcodes in your Office documents? Ensure you have the appropriate barcode fonts installed, download the add-in package, and begin creating professional, scannable barcodes in minutes. Remember to test all barcodes with a scanner before distribution and embed fonts when sharing documents to maintain barcode visibility across different systems.
For additional barcode integration options, video tutorials, and advanced customization capabilities, explore IDAutomation’s comprehensive barcode solutions and licensing options to find the perfect fit for your business needs.