AutoCAD’s Group feature is an invaluable tool for organizing drawing elements that share common properties or reside on different layers. By grouping geometry, you can select and manipulate multiple objects as a single unit, significantly streamlining your workflow. While not as versatile as Blocks, Groups offer a more flexible approach than Polylines for collecting disparate drawing elements. This guide delves into the creation, management, and application of AutoCAD Groups, empowering users with efficient drawing organization techniques.
Creating and Understanding AutoCAD Groups
The process of creating a group in AutoCAD is straightforward. Initiate the GROUP command, assign a unique name to your new group, select ‘NEW’, and then choose the objects you wish to include. Once grouped, these elements can be selected with a single click, treated as one cohesive object. Groups can contain diverse elements with varying properties and can reside on different layers, offering greater flexibility than Polylines. Unlike Blocks, geometry can be added or removed from a group dynamically during your work session. Furthermore, editing an individual element within a group is readily achievable, and copying a group creates a new, independent set of grouped elements without any link to the original.
It’s important to note that group names are automatically converted to uppercase and can be up to 31 characters long, including letters, numbers, and the special characters $, -, and _. Spaces are not permitted. While groups persist across sessions, they are not directly transferable between drawings like Blocks. Group names are not retained when a drawing is xref’d or inserted as a block, but the grouping is preserved if the xref is bound and exploded, or if the block is exploded.
TIP: Avoid creating excessively large groups, as this can negatively impact AutoCAD’s performance.
To create a named group:
- Type
GROUPat the command prompt. - In the Object Grouping dialog box, under Group Identification, enter a group name and an optional description.
- In the Create Group area, click New. The dialog box will temporarily close.
- Select the desired objects and press ENTER.
- Click OK.
Selecting and Managing Groups
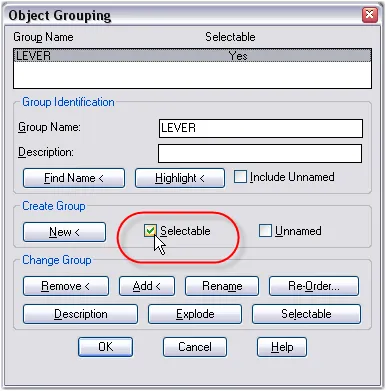
When an entity belonging to a group is selected, the entire group is highlighted. To select individual entities within a group, you can disable group selection for that specific group via the ‘Group’ command. With the ‘Object Grouping’ dialog open, select the group and click the ‘Selectable’ button.
TIP: A quicker method is to toggle group selection globally by pressing CTRL + H. Pressing CTRL + H again re-enables group selection. This keyboard shortcut controls the PICKSTYLE system variable, which also governs associative hatch selection.
The PICKSTYLE variable has the following values:
- 0: Disables group selection and associative hatch selection. Selecting a single entity will only select that entity.
- 1: Enables group selection. Picking an entity within a group selects the entire group.
- 2: Enables associative hatch selection. Picking a hatch selects its boundary geometry.
- 3: Enables both group selection and associative hatch selection.
You can also select a group by its name. Type SELECT at the command prompt, then GROUP (or G) and press ENTER. You will be prompted to enter the group name. This ‘G’ option is available whenever you are prompted for a selection.
TIP: The group name prompt is not case-sensitive.
Selecting a grip on an entity within a group selects the entire group, but only the selected grip will stretch. Other grip editing operations, like ‘Copy’ or ‘Move’, apply to the whole group.
Finding a Group’s Name and Identity
To determine the name of a group:
- Enter
GROUPat the command prompt. - In the Object Grouping dialog box, click the ‘Find name’ button.
- You will be prompted to pick a group.
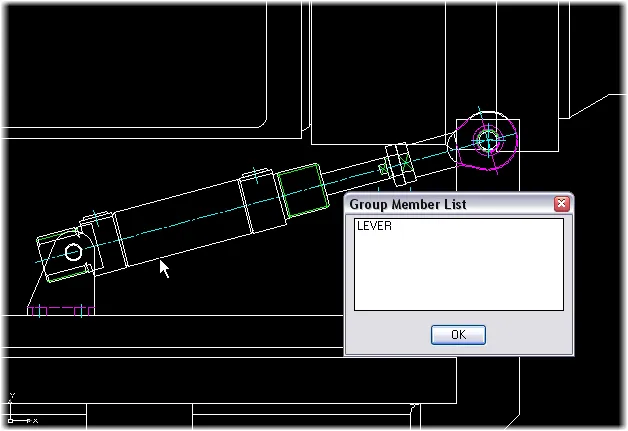
- The group name will be displayed.
- Click OK.
TIP: A group name starting with an asterisk () indicates an ‘Un-Named’ group.*
To highlight a group by its name:
- Enter
GROUPat the command prompt. - In the Object Grouping dialog box, select the group name from the list.
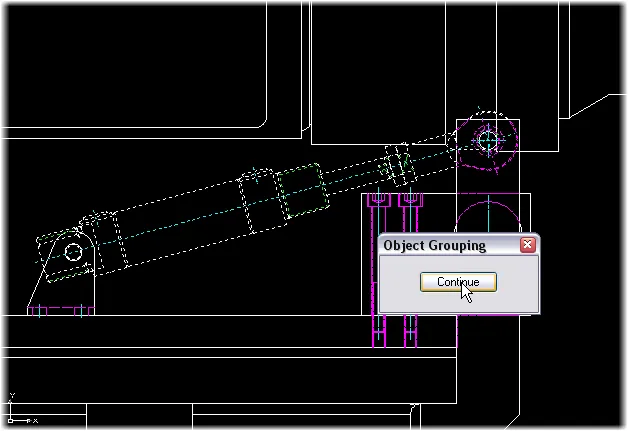
- With the group name highlighted, click the ‘Highlight’ button.
- The group will be highlighted on the graphics screen.
- Click Continue.
TIP: Perform a ‘Zoom All’ or ‘Zoom Extents’ before using the ‘Group’ command if the group you’re searching for might be off-screen.
TIP: Check the ‘Include Unnamed’ box to display and select any unnamed groups present in your drawing.
 Highlighting a group
Deleting and Modifying Groups
Deleting individual grouped geometry does not remove the group definition from the drawing. To delete a group definition, use the “Explode” option within the Object Grouping dialog box. This action disbands the group without altering its constituent objects, unlike exploding a block or hatch.
NOTE: Unpopulated groups are not removed by the ‘Purge’ command.
To delete a named group:
- Enter
GROUPat the command prompt. - Select the group name from the list.
- Under Change Group, select Explode.
- Click OK.

The Object Grouping dialog box also provides options to add or remove geometry from a group, reorder geometry within a group, and revise a group’s name or description. If removing objects leaves a group empty, the group definition remains but without any geometry.
TIP: Exploding an object (e.g., a block instance or hatch) that belongs to a group does not automatically add the resulting geometry to that group.
TIP: Using the -group command at the command line suppresses the Object Grouping dialog box, making various options available directly at the command prompt. This facilitates the integration of object grouping into scripts, command macros, or action recorder macros.
AutoCAD Groups offer a swift and convenient method for organizing drawing elements that must remain together. Strategic use of groups throughout your projects can lead to significant time savings.
For a more permanent solution to grouping geometry, consider exploring AutoCAD Blocks.