One of the most powerful advantages of using AutoCAD is the ability to tailor it to your company’s processes. Repetitive tasks can be automated, saving valuable time and minimizing errors. If you find yourself performing the same actions in AutoCAD more than once, scripting those tasks ensures you never have to repeat them manually. In this guide, we will explore how to create and implement AutoCAD scripts, focusing on automating a standard plot routine.
Understanding AutoCAD Scripts
In programming, a script is a set of instructions that run without user intervention. For AutoCAD, a script file is a plain ASCII text file containing command-line instructions, much like an actor following a written script. These files use the .scr extension.
Scripts can streamline processes like plotting, layer management, or title block updates, making your workflow more efficient and consistent.
Defining Your Process
Before automating, clearly define the task. For this example, our goal is to generate an A1 PDF plot of a drawing. Identify each step normally required for plotting and record it for scripting.
Recording Command Line Steps
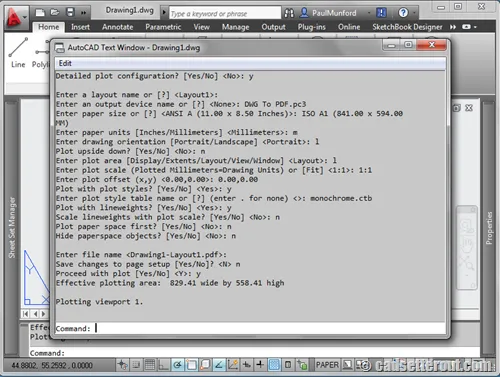
AutoCAD scripts cannot interact with dialog boxes, so we rely on the command line version of plotting: -PLOT (the hyphen suppresses the dialog). Manually go through the plot routine while noting the commands and options.
Tip: If unsure about a command prompt, type
?at the command line to list options. Record these in a text file for reference.
After completing the plot manually, open the text window (press F2) to review the executed steps.
Creating the Script File
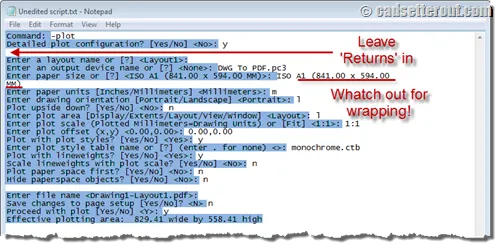
Open a new Notepad file (avoid Word or other word processors). Copy the commands from the AutoCAD text window and paste them into the Notepad file.
Cleaning Up the Script
Remove unnecessary command line prompts while keeping your responses. Empty lines represent pressing Return, so retain them.
Important: Ensure all commands are on a single line to avoid character wrapping from the AutoCAD text window.
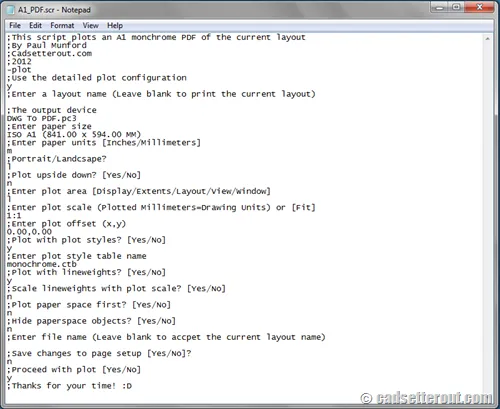
After cleanup, your script should resemble this:
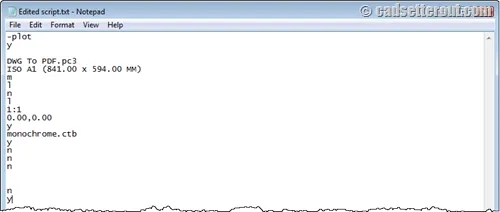
Include an empty line at the end of the script to finalize the command.
Testing and Running the Script
Save your file and change the extension to .scr. Ensure Windows is displaying file extensions to avoid mistakes. Then, drag and drop the script file into AutoCAD to execute it.
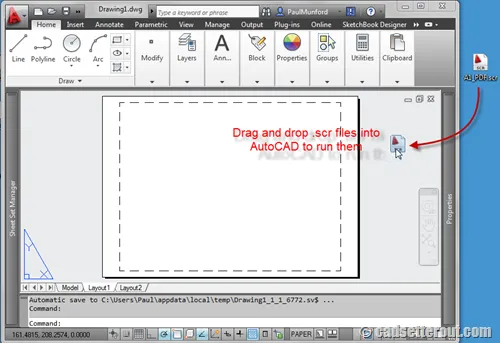 Dragging a SCR script file into AutoCAD
Debugging Scripts
Scripts may require several iterations to function correctly. Use the text window to identify where a script stops, adjust the .scr file, and test again until it runs smoothly.
Adding Comments for Clarity
Once functional, add comments with a semi-colon ; at the start of lines to explain each step. This ensures you or colleagues can understand the script later.
Practical Applications of AutoCAD Scripting
AutoCAD scripts are versatile. Beyond plotting, you can automate:
- Adding corporate standard layers or styles
- Updating title blocks across multiple drawings
- Batch processing files using
.batscripts or Autodesk’s free ScriptPro tool
For more advanced automation, consider exploring the differences between scripts and macros, which can further enhance your productivity.
By integrating AutoCAD scripting into your workflow, repetitive tasks become effortless, freeing you to focus on creative and technical challenges.
References
- Munford, P. “Automate AutoCAD with Scripts.” Cadsetterout.com. https://cadsetterout.com/
- Autodesk Knowledge Network. “ScriptPro Download and Tools.” https://knowledge.autodesk.com/
- Munford, P. “Differences Between Scripts and Macros.” Cad-notes.com. https://www.cad-notes.com/2012/03/how-to-automate-autocad-with-command-macros/