This guide shows how to extract useful schedules (door, column, wall) from an AutoCAD floor plan using the Data Extraction wizard. It’s aimed at technically minded CAD users who want reliable, repeatable workflows for reporting object properties, quantities, and basic fabrications estimates. The primary keyword is “data extraction” and examples target AutoCAD’s built-in tools and dynamic blocks.
Quick overview (what you’ll get)
- Step-by-step Data Extraction workflow for doors, columns, and walls
- Tips for filtering properties (dynamic block parameters)
- Output options (table inside drawing or external files such as Excel)
- Workarounds for limitations (wall grouping and aggregation)
- Best practices to preserve accuracy and EEAT (expertise, experience, authoritativeness, trust)
Introduction
Data extraction in AutoCAD automates the creation of schedules from drawing objects, turning block attributes, dynamic block parameters, geometry measures, and layer/coordinate data into tabular reports. Use it when you need consistent door/column lists, material takeoffs, or component counts without manual tallying. This tutorial assumes you have a floor plan (your own or a sample dataset) and familiarity with dynamic blocks.
Preparation: open the drawing
- Open your floor plan DWG that contains doors, columns, and walls (or download a sample DWG).
- Ensure your reusable content (dynamic blocks for doors/columns) exposes parameters such as Width, Type, or Name so Data Extraction can read them.
- Save a copy to experiment; create a .dxe extraction template to reuse later.
Step-by-step: Create a Door Schedule with Data Extraction
- Start the wizard
- Ribbon: Insert > Linking & Extraction > Extract Data. This launches the Data Extraction wizard.
- Page 1 — Begin
- Create a new data extraction and save it as a template (for example, door_schedule.dxe). Reuse for future door runs.
- Page 2 — Define data source
- Choose between extracting from entire drawing(s) or selected objects. For single-sheet workflows, select the drawing/sheetset.
- Page 3 — Select objects
- Filter object types. Select only the Dynamic Block category (or specifically SingleDoor blocks) so other geometry is excluded.
- Page 4 — Select properties
- In Category filter, uncheck everything except Dynamic Block.
- Check the relevant parameter(s): Width (and any other dynamic parameters you need, e.g., Height, Tag). These parameters come from how the dynamic block was created; ensure a parameter is named and exposed (e.g., Width).
- Page 5 — Refine data
- Preview the table, reorder columns, and sort by header names. Confirm values read correctly (widths should match block instances).
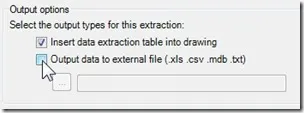
- Page 6 — Choose output
- Choose to insert as a table into the drawing, or export to an external file (CSV, XLSX, DBF, or text). For downstream editing or aggregation, export to Excel.
- Page 7 — Table style
- Pick or create a table style. Set a clear title such as “Door Schedule” and format units and precision appropriately.
- Page 8 — Finish
- Click Finish and place the table in the drawing, or open the exported spreadsheet.
Tip: If your dynamic block parameter names are inconsistent, rename them in the block editor so the extraction produces consistent column headings.
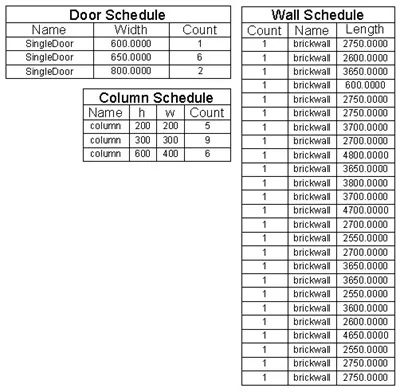
Column and Wall Schedules
- Column schedule: repeat the same extraction workflow but filter to column blocks and include properties such as Size, Type, Material. Data extraction can distinguish multiple column types even if only one block definition exists because it reads instance parameter values.
- Wall schedule: extract walls and geometric properties (length, layer, style). Limitation: AutoCAD groups only exact matches (same name and same length). It will not aggregate walls by typical groups (e.g., same wall type but different segment lengths) unless you process the data externally.
Workaround for wall aggregation:
- Export wall data to Excel, use pivot tables or formulas to sum lengths by wall type/name, then import results back or use them for takeoff. This is often the fastest way to produce aggregated wall schedules.
Output options and downstream use
- Insert Table in Drawing: fast for printable documentation and record-keeping.
- Export to Excel/CSV: best for aggregation, calculations (area, material estimates), and importing into other software (BOM, ERP).
- Database export: useful when automating reporting across multiple drawings or projects.
Example use cases:
- Door schedule: widths, quantities, and door types for procurement and fabrication.
- Column schedule: sizes and counts for reinforcement estimation.
- Wall schedule: lengths by layer/type for plastering/finishing estimates (aggregate in Excel).
Practical tips and best practices
- Expose needed parameters in dynamic blocks. Standardize parameter names (Width, Height, Type, Tag) to simplify extracts.
- Save .dxe templates per schedule type (doors, columns, walls) for repeatability.
- Validate results visually: cross-check a few instances to ensure extracted values match block geometry and attributes.
- Use consistent units and set table precision to avoid confusion in measurements.
- Cite and link to authoritative references for complex workflows (Autodesk documentation, Revit/AutoCAD forums) when sharing procedures in team documentation.
Image examples and where to place them
(Place images between paragraphs—do not put images inside the intro or directly after headings; ensure at least one paragraph separates heading and image. Use images to illustrate the wizard preview, output options, and final schedule placement.)

After the refinement and output choices, it helps to see the preview and final output:
You can export directly to an external file for detailed editing:
Final schedule placed in drawing illustrates how AutoCAD tables appear:
Common pitfalls and how to avoid them
- Missing parameters: If parameters weren’t added when the block was authored, Data Extraction can’t read them. Fix by editing the block to add parameters or attributes.
- Inconsistent naming: Standardize parameter/attribute names to simplify filters and Excel aggregation.
- Overlooking precision/units: Mismatched units will produce incorrect quantities; set units consistently in both drawing and table export options.
References and further reading
- AutoCAD Help — Data Extraction (official documentation)
- Dynamic Block authoring guides for parameter creation
- Tutorials on exporting DWG data to Excel and using pivot tables for aggregation
- Community threads and sample DWGs for hands-on practice
Call to action
Try creating a reusable .dxe template for each schedule type in your office standard. Export one wall schedule to Excel and build a pivot that groups by wall type — you’ll save time on every subsequent project.