AutoCAD’s explode command is an essential tool for working with composite objects in your drawings. When you create complex designs using polylines, blocks, arrays, or dimensions, these elements often function as single unified objects. However, there are times when you need to break them down into their individual components for editing or modification. That’s exactly what the explode command does—it decomposes composite objects into their constituent parts, giving you granular control over every element. This comprehensive guide will walk you through everything you need to know about using the explode command effectively, including which objects can be exploded, step-by-step execution methods, and solutions for common issues like blocks that won’t explode.
What Is the Explode Command?
AutoCAD features a powerful explode command (EXPLODE) designed to break down composite objects into their individual components. A composite object is formed when multiple elements combine to create a single object—such as polylines, blocks, array copies, and other grouped entities. It’s important to note that single-element objects cannot be exploded since they’re already in their simplest form.
When you explode a composite object, it separates into its individual component objects, allowing you to modify, delete, or edit specific parts independently.
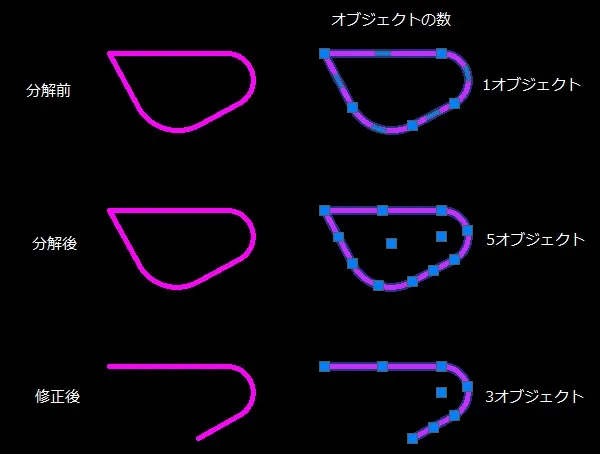
Consider the example above showing a polyline object before and after exploding. When you click the polyline before exploding, all line segments and arcs are selected together as one object (top image). This is because it’s a composite object. After exploding, each line segment and arc becomes an independent object (middle image). This allows you to delete or edit specific portions individually (bottom image).
As mentioned earlier, simple line objects cannot be exploded since they’re already single-element objects. A common question is: “Why do hatch pattern lines get exploded?” The answer is that hatch patterns are composite objects created from line objects or point objects arranged in a specific pattern.
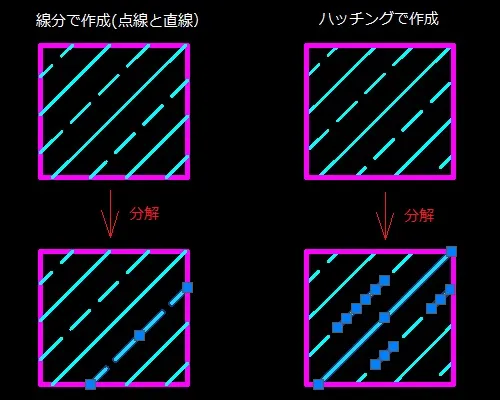
The left image shows seven individual line objects created with solid and dashed line types. The right image shows a single hatch object created with the “ANSI33” pattern. When you explode both, the left side remains unchanged (since they’re already single objects), while the right side breaks down into multiple individual line objects because it was designed as a composite object using line segments to create a dashed appearance.
Types of Objects That Can Be Exploded
The following object types can be exploded in AutoCAD:
- Polylines
- Polygons and rectangles created with polygon/rectangle commands
- Blocks
- Regions
- Dimension lines
- Leaders
- Array copies
- MText (Multiline text)
- Multilines
- Revision clouds
- 3D polylines (AutoCAD full version only, not available in AutoCAD LT)
- 3D solids (AutoCAD full version only)
- Bodies (AutoCAD full version only)
- Mesh objects (AutoCAD full version only)
Note: Objects marked with ※ are available only in the full version of AutoCAD, not in AutoCAD LT.
How to Execute the Explode Command
There are several ways to execute the explode command in AutoCAD:
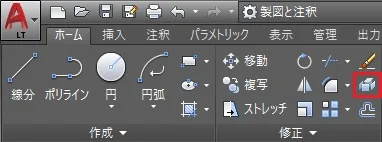
- Ribbon menu: Click “Explode” in the Modify panel
- Full command: Type EXPLODE
- Alias: Type X
Since the full command requires typing 7 characters, using the alias “X” or the ribbon menu is more efficient for daily work.
Exploding Polylines, Polygons, and Rectangles
Let’s explore how to explode objects created with polyline, polygon, and rectangle commands.

Step 1: In this example, we’ll use the ribbon menu. Click Explode in the Modify panel.
Step 2: The command line displays “Select objects“. Click the objects you want to explode. While you can click objects one by one, it’s more efficient to use a crossing window to select all objects at once.
Step 3: Create a crossing window that encompasses all the shapes. In this case, click the bottom-right corner as the starting point, then click the top-left corner (P1 to P2).
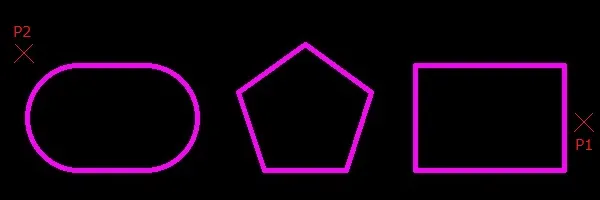
Step 4: The command line shows “3 objects selected“, indicating the selection is complete. Press “Enter”, “Space”, or right-click to execute.
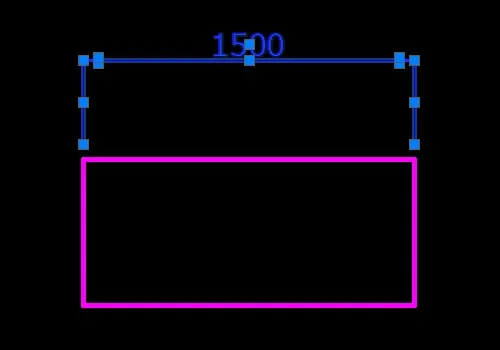
Step 5: The objects are now exploded. When you click individual objects, you’ll see they’ve been broken down into single elements. The polyline is now 2 arcs and 2 lines, the polygon is 5 separate lines, and the rectangle is 4 individual lines. The explode command automatically ends after execution.

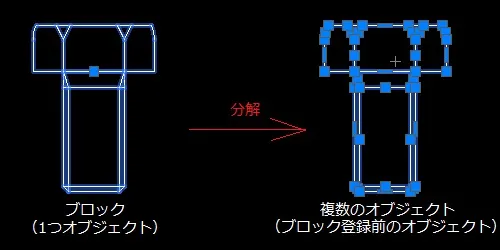
Exploding Blocks
Blocks are a powerful AutoCAD feature that allows you to combine multiple shapes into a single named object that can be inserted and reused throughout your drawing (think of it as creating your own custom catalog or parts library).
Block Characteristics:
- Combines multiple objects into a single unified object
- Can be reused repeatedly once registered (block reference)
- Requires exploding to edit individual components
- Scale and rotation can be modified during insertion
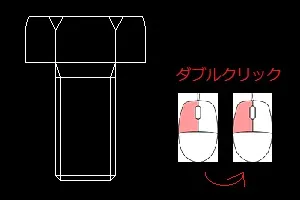
How to Explode Blocks
Let’s explode a block that was inserted using block reference.

Step 1: In this example, we’ll use the alias. Type “X” on the keyboard, then press “Enter”, “Space”, or right-click to execute.
Step 2: The command line displays “Select objects“. Click the block you want to explode with your mouse.
Step 3: The command line shows “1 object selected“, confirming one block has been selected. Press “Enter”, “Space”, or right-click to execute.
Step 4: The block is now exploded. When you click the objects, you’ll see they’ve been separated into individual components. The explode command ends automatically after execution.
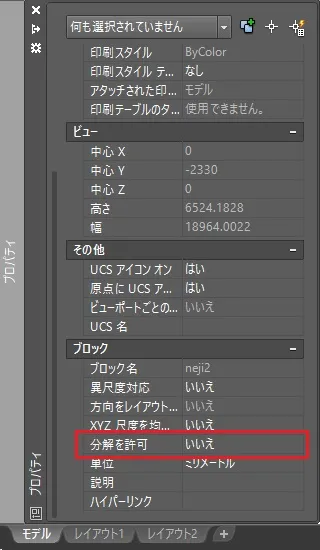
When Blocks Cannot Be Exploded
Sometimes when you select a block and execute the explode command, you’ll see the message “Cannot explode” in the command line, and the block won’t break apart.
This occurs because the block has been set to “Do not allow exploding“. This message has been displayed in AutoCAD versions 2006 and later. Here’s how to check and modify this setting to enable block explosion:
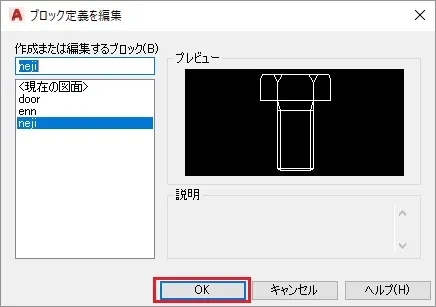
Step 1: Double-click the block that won’t explode. Alternatively, type “BEDIT” on the keyboard and press “Enter”, “Space”, or right-click.
Step 2: The “Edit Block Definition” dialog box appears with a preview of your selected block. If it’s correct, click “OK” at the bottom. If the wrong block is displayed, select the correct block name from the list on the left and click “OK”.
Step 3: The Block Editor screen opens, displaying your selected block. Move your cursor to the right side where “Properties” is located. The Properties palette will appear.
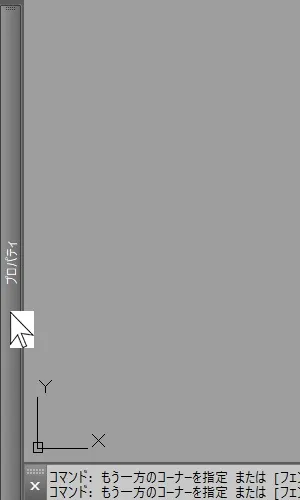
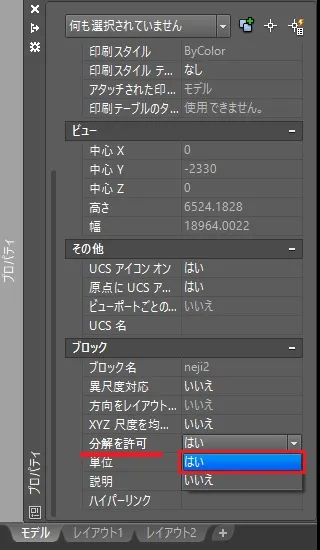
Step 4: In the lower section of the Properties palette, locate the “Block” area. You’ll see “Allow exploding” is set to “No“.
Step 5: Click “No” and click again (or click the dropdown arrow ▼) to change it. Select “Yes“.
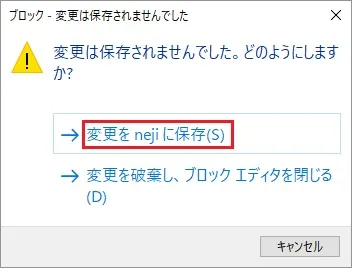
Step 6: Click “Close Editor” in the ribbon.
Step 7: A dialog box appears. Click “Save” to return to the normal drawing view.
Step 8: The block is now set to allow exploding. Let’s try exploding it using a different method this time. First, select the block, then click Explode in the Modify panel of the ribbon menu.
Step 9: The block explodes successfully. The command line shows “1 object selected“, confirming one block has been exploded. The explode command ends automatically.
Exploding Array Copies
Let’s explode polygon objects created with the array command.

The array command has two options: “Associative Array” and “Non-associative Array“. The default setting is “Associative Array“. While associative arrays allow easy modification after creation, you cannot edit individual objects within the array. To modify just one object in the array, you need to explode it first.
In this example, we’ll explode a polygon created with an associative array.
For this example, we’ll use the alias. Type “X” on the keyboard, then press “Enter”, “Space”, or right-click to execute.
Step 2: The command line displays “Select objects“. Click the array object you want to explode with your mouse.
Step 3: The command line shows “1 object selected“, confirming one array object is selected. Press “Enter”, “Space”, or right-click to execute.
Step 4: The array is now exploded. When you click one of the objects within the former array, you’ll see it’s now an independent polygon object.
If you explode this polygon again, it will break down into 5 individual line segments. The explode command ends automatically after execution.
Exploding Dimension Lines
Let’s explode dimension lines created with the dimension command.

The dimension command can be configured via system variables to create dimensions as “Exploded”, “Non-associative”, or “Associative”. The default setting is “Associative“. We’ll explode a dimension line created with the associative setting.
Step 1: In this example, we’ll use the ribbon menu. Click Explode in the Modify panel.
Step 2: The command line displays “Select objects“. Click the dimension line you want to explode with your mouse.
Step 3: The command line shows “1 object selected“, confirming one dimension object is selected. Press “Enter”, “Space”, or right-click to execute.
Step 4: The dimension is now exploded. When you click the dimension, you’ll see it’s been broken down into individual line objects. It has been separated into lines, MText, and arrowheads (filled/solid). The explode command ends automatically after execution.
Summary
Have you mastered the explode command? When you attempt to explode an object that cannot be exploded, the command line (or command window) displays “0 objects exploded” and the command ends without making changes.
When you select multiple objects and the command line shows “5 objects selected,