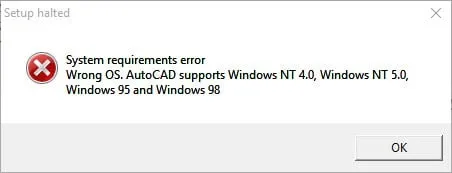
Many AutoCAD 2000 users rely on this legacy software for their workflows, but installing it on modern Windows versions often results in errors like:
Or:
Fortunately, with the right steps, you can still install and run AutoCAD 2000 smoothly.
Step-by-Step Installation Guide
Prerequisites
- Longbow Converter Tool: Download here.
- Disable Windows UAC: Follow this guide to turn off User Account Control.
Installing AutoCAD 2000
Launch the Longbow Converter
- Double-click the Longbow Converter shortcut on your desktop.
Prepare the Installation
- Insert your AutoCAD 2000 CD.
- Navigate to the “Old AutoCAD Installer Reviver” tab.
- Click the ‘…’ button and select your AutoCAD 2000 CD.
- Click “Run Old Installer”.
Follow the Migration Wizard
- Click “Install 2000” as usual.
- Wait at least 45 minutes for the
setup.exeto fully load—patience is key.
Custom Installation Directory
- During setup, when prompted for the installation folder, manually set the path to
c:acad2000(not the defaultProgram Files (x86)AutoCAD 2000).
 Setting AutoCAD 2000 custom install directory to c:acad2000
- Ignore the error “Cannot create folder AutoCAD 2000”—you’ll create the shortcut manually later.
- Do not reboot if prompted.
- During setup, when prompted for the installation folder, manually set the path to
Finalize the Installation
- Close the setup program completely.
- Return to the Longbow Converter and ensure the “Old AutoCAD Program Reviver” tab displays “SUCCESS” in green.
- Reboot your PC.
Run AutoCAD 2000
- Navigate to
c:acad2000using Windows Explorer. - Double-click acad.exe to launch AutoCAD 2000.
- If you want a desktop shortcut, create it manually.
- Navigate to
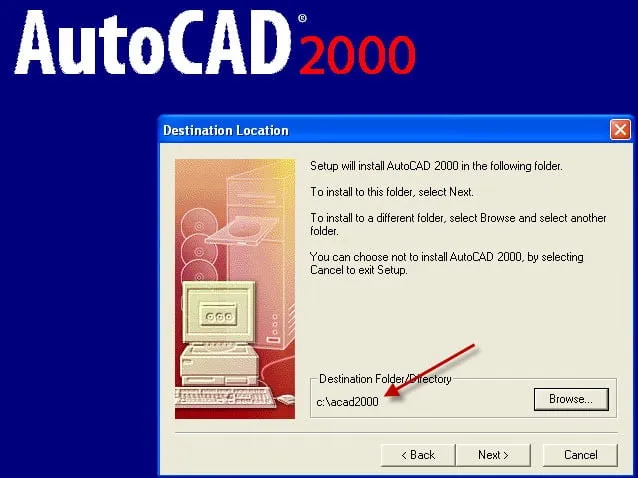 Setting AutoCAD 2000 custom install directory to c:acad2000
Installing Additional Components
AutoCAD 2000 Express Tools
If you encounter the “Missing Application: RTEXT” Proxy dialog, install Express Tools Volume 9:
- Follow the guide here.
ObjectDBX Classes Object Enabler
- Download the ObjectDBX Enabler.
- Extract to
c:Autodesk. - Use the Longbow Converter:
- Select the “Old AutoCAD Installer Reviver” tab.
- Pick the
c:AutodeskAutoCAD 2000 – ObjectDBX Classes Object Enablerfolder. - Click “Run Old Installer” and proceed normally.
AEC Object Enabler 2.11
- Download AEC Object Enabler 2.11.
- Extract to
c:AutodeskAutoCAD2000-AEC211. - Repeat the Longbow Converter steps as above.
Architectural Object Enabler 3.02
- Download Architectural Object Enabler 3.02.
- Extract and install normally.
Service Packs
Service Pack 1:
- Download SP1.
- Extract to
c:AutodeskspAutoCAD 2000 sp1. - Use the Longbow Converter to run the installer (wait up to 45 minutes).
Service Pack 2:
- Download SP2.
- Extract to
c:AutodeskspAutoCAD 2000 sp2. - Repeat the Longbow Converter steps.
3D Graphics System Update
- Download the 3D Graphics Update.
- Extract to
c:Autodeskupdate. - Use the Longbow Converter to run the installer (wait up to 45 minutes).
- Note: If the update doesn’t apply, contact Longbow Software Support.
Troubleshooting Common Issues
| Issue | Solution |
|---|---|
| Setup doesn’t start after 45 minutes | Use the Longbow Converter’s 3rd tab to fix the c:acad2000 folder, then reboot. |
Missing DLL errors (e.g., aclst15.dll, ACUTIL15.dll) | Apply the same fix as above. If unresolved, contact support. |
| Proxy Warning Dialogs in DWG files | Install all Service Packs as described. |
| WinHelp() error when pressing F1 | Install Microsoft’s WinHlp32.exe. |
| Calcomp Digitizer not working | Follow this guide. |
| “Wrong OS” error persists | Copy the AutoCAD 2000 CD to your PC and restart from Step 1. If the issue remains, update the Longbow Converter. |
| AutoCAD crashes on File > Open/Save | Refer to this troubleshooting guide. |
Copyright 2026 (c) Longbow Software