Drawing a perfect five-pointed star in AutoCAD might seem like it requires a dedicated star tool — but it doesn’t. With a smart combination of the Polygon, Trim, Hatch, and Block commands, you can construct a geometrically precise star that’s ready to be placed anywhere in your drawing. This tutorial walks you through every step, from understanding how AutoCAD’s polygon tool works under the hood to packaging the final result as a reusable block.
Why There’s No Star Tool in AutoCAD
Students frequently ask: doesn’t AutoCAD have a built-in star command? The short answer is no — but the polygon tool more than compensates for that gap. Understanding why requires a quick detour into polygon geometry, and that understanding will make you a more confident user of AutoCAD’s drawing tools overall.
A polygon, by definition, needs at least three sides. Three sides gives you an equilateral triangle, four a square, five a pentagon, six a hexagon — and so on toward infinity, where a polygon with an astronomical number of sides becomes indistinguishable from a circle. The five-sided pentagon is exactly what we need as a construction aid for drawing a star.
Step 1 — Draw a Reference Circle
Before touching the Polygon tool, draw a circle. Use any center point and set the radius to 36 units. This circle isn’t decorative; it serves as a geometric scaffold that will control the size and orientation of the pentagon you’re about to create.
One quick productivity note: the default AutoCAD hotkey for the Circle command is C, but many experienced users reassign C to the COPY command (used far more frequently) and set CI to trigger CIRCLE instead. The Command Alias Editor makes this a two-minute change that pays dividends every day.
Step 2 — Understand Inscribed vs. Circumscribed Polygons
When you launch the Polygon tool — found in the Home tab, Draw panel, under the Rectangle pull-down arrow — AutoCAD immediately asks how many sides you want. Type 5 and press Enter.
After you specify the center point, AutoCAD presents a choice that confuses many beginners: Inscribed in circle or Circumscribed about circle. Here’s the practical difference:
- Inscribed: The polygon fits inside the imaginary circle, with its vertices touching the circle’s edge. This is the default, and the one to use here.
- Circumscribed: The polygon wraps outside the circle, with the circle’s edge touching the midpoints of each polygon side. The result is a noticeably larger shape — and it appears rotated relative to the inscribed version.
For star construction, always accept the Inscribed default by pressing Enter. The polygon’s corner points will land precisely on the circle’s circumference, which is exactly what you need.
Step 3 — Place the Pentagon
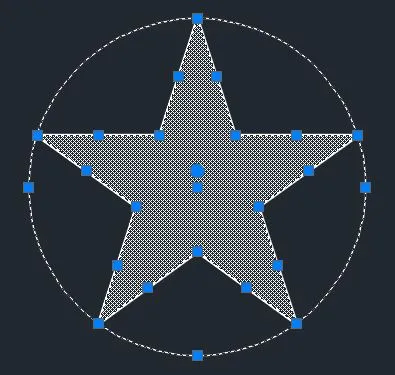
With OSNAP active, use the Center snap to click the exact center of your circle. When AutoCAD asks for the radius of the imaginary circle, snap to the top quadrant of your reference circle — the 12 o’clock position. This ensures the pentagon is oriented with one vertex pointing straight up, which is the classic star orientation.
You now have a five-sided polygon sitting inside your circle. Changing its color to yellow improves visibility during the next construction steps.
Step 4 — Connect the Vertices to Form the Star
This is the step that transforms a simple pentagon into a pentagram. Using the Line tool with Endpoint snaps active, connect the five corner points of the pentagon — but skip one vertex each time you draw a line. The result is the classic five-pointed star crossing pattern, identical to the method of drawing a star in one continuous stroke without lifting your pen.
Once all five crossing lines are drawn, delete the pentagon. It has done its job. Keep the circle — you’ll need it one more time to define the block’s base point.
Step 5 — Trim the Interior Lines
At this stage your drawing shows a pentagram: a star shape with ten triangular segments, but also five interior line segments cluttering the middle. The TRIM command cleans this up efficiently.
Launch TRIM and press Enter immediately to designate all objects in the drawing as cutting edges. Then click each of the five interior line segments — the ones that form the inner pentagon shape at the heart of the star. They disappear, leaving a clean, open star outline.
Step 6 — Apply a Solid Hatch
With the star outline complete, use the Hatch tool to fill the circle surrounding the star with a solid white hatch pattern. This creates a filled circular background that makes the star stand out visually and gives the final block a polished, professional appearance.
Step 7 — Create a Reusable Block
Press Ctrl-A to select everything in the drawing. Then hold Shift and click the reference circle to remove it from the selection set. Only the star’s linework and the white hatch should remain selected.
Type BLOCK to open the Block Definition dialog. Name the block STAR. Click the Pick point button, use Shift + Right-click to access the snap override menu, and choose Center snap. Click on the circle’s edge to capture its exact center as the block’s base point, then confirm with OK.
This detail matters more than it might seem. The hatch object within the star does have its own grip point near the center, but it doesn’t land at the geometric center of a five-pointed star — finding that exact point without a reference circle is a surprisingly tricky geometric problem. By anchoring the block’s base point to the circle’s center before deleting the circle, you lock in a mathematically precise insertion point that lets you place the star accurately into grids, title blocks, or any geometric layout.
Once the block is defined, erase the reference circle. Your STAR block is complete and ready for insertion anywhere in your drawing.
Conclusion
Drawing a five-pointed star in AutoCAD is a great exercise in understanding how the Polygon tool works with its inscribed/circumscribed circle logic, how TRIM can clean up complex line intersections, and how the Block command can package geometry with a precise anchor point. The workflow — circle → pentagon → pentagram → trim → hatch → block — takes only a few minutes once you’ve done it once, and the resulting block is genuinely useful for decorative drawings, maps, flags, or any project where accurate star placement matters. Keep experimenting with AutoCAD’s core drawing tools, and you’ll find that most “missing” shapes are just a few creative steps away.